Configuring an SMTP Settings for AppSpider Enterprise
Connecting your AppSpider Enterprise instance to an SMTP server can be really useful. It enables you to receive notifications when scans are started and when reports are ready to be viewed. It also lets you easily reset your password if you forget it.
There are a couple of ways for you to add an SMTP server for AppSpider Enterprise:
- During installation - The AppSpider Enterprise installer includes options for you to connect to an SMTP server. You'll need to provide the SMTP server address, the port that SMTP runs on, and the credentials to authenticate to the server.
- Post installation - If you did not connect your SMTP server to AppSpider Enterprise during the installation process, you'll be able to set up SMTP post-installation by modifying the NTOE configuration file.
Connecting your SMTP server during installation
The easiest way to connect to an SMTP server is to do it when you install AppSpider Enterprise. The installer provides a guided interface that asks you for the information that is needed to set up AppSpider Enterprise, such as where you want to install your source files, store your data files, and the information needed to connect to your database.
After you provide these details, you'll be able to provide the information for your SMTP server. To set up an SMTP server for AppSpider Enterprise during installation, you'll need to make sure that you select the "Use SMTP server" option.
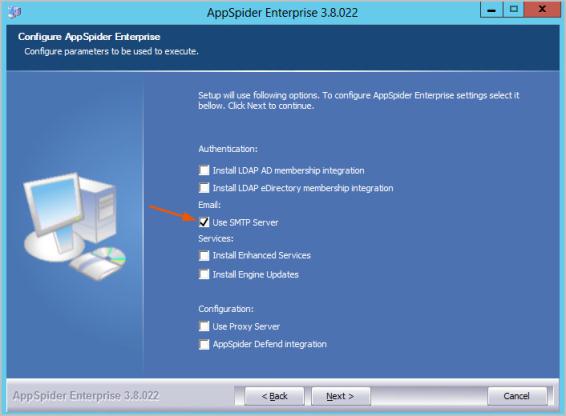
On the following screens after you set up the database connection, you'll need to provide the following details about your SMTP server:
- SMTP server address - The address that your SMTP server runs on.
- SMTP port - The port that SMTP runs on.
- SMTP user name - The user name that can be used to authenticate to the SMTP server.
- SMTP password - The password that can be used to authenticate to the SMTP server.
- SSL encryption - You can choose to use SSL to encrypt your email communications.
- Response email - The e-mail address that is used as the sender's address.
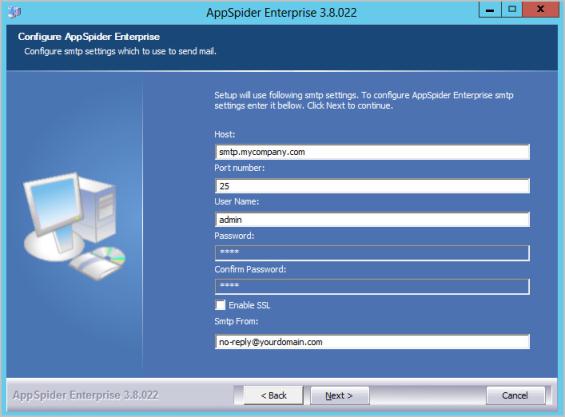
After you configure your SMTP settings, you can continue with the rest of the installation.
Connecting your SMTP server after installation
If you have already installed AppSpider Enterprise and you want to connect to your SMTP server, you'll need to modify the NTOE configuration file and add the information for your SMTP server. There are two versions of the NTOE configuration file that need to be modified. They are located in the following directories:
C:\Program Files(x86)\Rapid7\AppSpider Enterprise 3.x\IIS.NET\binC:\Program Files(x86)\Rapid7\AppSpider Enterprise 3.x\AppSpiderScheduler2
You'll need to replace "3.x" in the file path with the version of AppSpider Enterprise you are running.
To connect AppSpider Enterprise to an SMTP server:
- Open
C:\Program Files(x86)\Rapid7\AppSpider Enterprise 3.x\IIS.NET\bin\NTOE.configwith a text editor. You may need to have administrator privileges to edit the file. - Find the
system.netelement. - Within that element, find the line that starts with
<smtp from="">. - Within the quotes, provide the email address you want to use as the sender's address, such as
no-reply@yourcompany.com.
- Find the line that starts with
<network host ="">.
- Provide the information for the following options:
- Network host - The address that your SMTP server runs on.
- Port - The port that SMTP runs on. SMTP typically runs on port 25 or 2525.
- UserName - The user name that can be used to authenticate to the SMTP server.
- Password - The password that can be used to authenticate to the SMTP server.
- enableSSL - You can choose to use SSL to encrypt your email communications. Enter a value of true to enable SSL or use the default value to disable SSL.
- Save the file.
Repeat these steps again for C:\Program Files(x86)\Rapid7\AppSpider Enterprise 3.X\AppSpiderScheduler2\NTOE.config.