Custom Credential Mutations
Credential mutations mangle the passwords in a wordlist. You can use them to create numerous permutations of a password, such as switch out letters for numbers (password becomes “passw0rd”), thus enabling you to build a large wordlist based on a small set of passwords.Credential mutations can also add numbers and special characters to a password, toggle the casing of letters, and control the length of a password.
Metasploit Pro offers several canned mutations that you can use. However, if you want to generate a custom mutated credentials list,you will need to run your wordlist through a password cracking tool like John the Ripper. John the Ripper will apply a set of mangling rules to the wordlist and output a list of mutated credentials that you can import into a project.
John the Ripper
John the Ripper is a free password cracker that is available for many flavors of Unix, Windows, DOS, BeOS, and OpenVMS. John the Ripper is typically used to detect weak passwords and hashes, but you can also use it to generate a mutated wordlist that you can import into Metasploit to use with Bruteforce.
Downloading and Installing John the Ripper
The Metasploit installer includes the binaries for John the Ripper 1.7.8, which are located in path/to/metasploit/apps/pro/msf3/data/john. To run John the Ripper, you'll need to simply invoke the binary from the run directory for your target. If you want the latest version of John the Ripper, you will need to install it. John the Ripper has extensive installation instructions located at http://www.openwall.com/john/doc/INSTALL.shtml. However, if you'd rather learn from us, read on.
To start, you will need to download John the Ripper at http://www.openwall.com/john/. A free, community enhanced, and commercial version of John the Ripper are available. Download the version that works for your system.
John the Ripper is distributed primarily in source code form and downloaded as an archive file. After you download the archive file, you will need to extract its contents. To run John the Ripper, you will simply need to invoke it from the extraction location.
Installing John the Ripper on Linux
Open a terminal and type the following:
sudo -sH
cd /opt
wget http://www.openwall.com/john/j/john-1.8.0.tar.gz
tar -xvzf john-1.8.0.tar.gz
mv john-1.8.0 john
rm john-1.8.0.tar.gz
If you are using a different version of John the Ripper, replace 1.8.0 with the version you have.
cd /opt/john/src
make
Make displays a list of targets. Choose the best one for your architecture and rerun the make command with the target you have chosen. For example, for a Linux x86-64 system, type the following:
make clean linux-x86-64
John the Ripper is now installed on your Linux system and is ready to use.
Installing John the Ripper on Windows
- Go to http://www.openwall.com/john and download the latest Windows installer.
The binaries for Windows will be available in a ZIP file. - Locate the downloaded file and extract it to your
Cdrive. The resulting directory will be something likeC:\john179.
If you are using a different version of John the Ripper, replacejohn179with the version you have. - Rename the directory to
john. The resulting directory will beC:\john.
John the Ripper is now installed on your Windows system and is ready to use.
Running John the Ripper on Linux
Open the command line terminal and type the following:
sudo -sH
cd /path/to/john/run
./john
Replace /path/to/ with the location where you have John the Ripper installed.
John the Ripper prints a list of options that are available. For more information on John the Ripper options, see http://www.openwall.com/john/doc/OPTIONS.shtml.
Running John the Ripper on Windows
Open the command line terminal (Start > Run > cmd) and type the following:
cd \path\to\john\run
john
Replace \path\to\ with the location where you have John the Ripper installed.
John the Ripper prints a list of options that are available. For more information on John the Ripper options, see http://www.openwall.com/john/doc/OPTIONS.shtml.
Custom Mutation Rules
Now that you have John the Ripper installed and verified that it runs, you can add mutation rules to the John configuration file. A rule enables you to perform a specific type of mutation on a word. For example, you can create a rule that appends specific special characters, such as [!@#$%^&*()+=.?], to every word in the wordlist.
To define custom mutation rules, you will need to create rule sets in the John configuration file. A rule set is a logical grouping of related mutation rules. All mutation rules must be contained within a rule set. For example, you should create separate rule sets for rules that append characters, rules that prepend characters, and rules that control character lengths.You will need to supply the rule sets as part of the rules option when you generate the wordlist, like the following:
./john --wordlist=[path to word list] --stdout --rules:[ruleset name] > [path to output list]
Custom Rule Set Requirements
Each rule set section must start with its type and name enclosed in brackets. Rule sets must use the following format: [List.Rules:<name>], where <name> is replaced with the name of the rule set.
For example, if you have a rule set named AppendLowercaseNumbers, the section must be written as [List.Rules:AppendNumbers] in the John configuration file.
So, your rule set will look something like this:
[List.Rules:AppendLowercaseNumbers]
#lowercase and add numbers to the end of a password
l$[0-9]
l$[0-9]$[0-9]
l$[0-9]$[0-9]$[0-9]
l$[0-9]$[0-9]$[0-9]$[0-9]
Also, here are a couple of other formatting rules that you should remember:
- Section names are not case sensitive.
- Comment lines start with a hash ("#") or a semicolon (";").
- Empty lines are ignored.
- Rule sets can be placed anywhere in the John configuration file, but as a best practice, you should add them to the bottom of the file.
Accessing the John Configuration File
To access the John configuration file, go to /path/to/john/run. The configuration file will be named either john.conf or john.ini depending on your operating system. You will need to open the configuration file using a text editor, like Vim (Linux) or Notepad (Windows).
Opening the File in Linux
sudo -sH
cd /opt/john/run
vim john.conf
If you do not have Vim, you can install it with the following command: apt-get install vim.
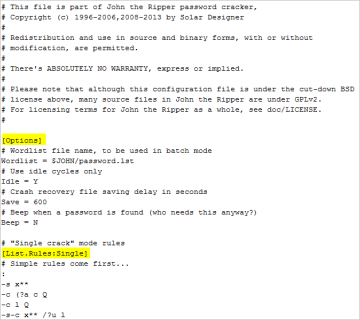
The configuration file consists of several sections. Each section has a unique function and is assigned a section name that is enclosed in square brackets, as shown below:
Basic John the Ripper Rules Syntax
John the Ripper has great documentation that explains the syntax for building rules. You can read them at http://www.openwall.com/john/doc/RULES.shtml. It is highly recommended that you review their documentation before building your own custom rules.
To help you get started, here is a quick overview of some of the commands you might be interested in:
- $ appends a character or number to a word. You can define a single character, such as
$1, which will append the number 1 to a password, or you can define a group of characters, such as $[0-9], which will append 0, 1, 2, 3 ,4, 5, 6, 7, 8, and 9 to a password. - ^ prepends a character or number to a word. You can define a single character, such as
^1, which will prepend the number 1 to a password, or you can define a group of characters, such as ^[0-9], which will prepend 0, 1, 2, 3 ,4, 5, 6, 7, 8, and 9 to a password. - l converts all the letters in the word to lowercase.
- c converts all of the letters in the word to uppercase.
- C lowercases the first character in the word and uppercases the rest.
- t toggles the case of all characters in the word.
You can use any combination of commands within a rule. For example, you can create rules that prepends and appends numbers to a password, such as ^[0-9]$[0-9]. Each rule must appear on a newline.
Creating Custom Mutation Rules
Now, let's go ahead and add some mutation rules to the John configuration file.
The following mutations are covered:
- Appending a number to a password.
- Prepending a number to a password.
- Appending special characters to a password.
- Prepending special characters to a password.
- Lowercasing the password and adding special characters and numbers to it.
- Uppercasing the password and adding special characters and numbers to it.
To add these rules, open the John configuration file with a text editor and scroll to the bottom of the file. You can copy and paste any of these rules to the John configuration file, or you can use these as examples to build your own rules. After you have added the rules to the John configuration file, remember to save your changes.
Before you make any modifications to the John configuration file, you should make a copy of the original file in case you need to revert back to it.
Appending Numbers to a Password
[List.Rules:AppendNum]
#Appends one, two, and three numbers to a password
$[0-9]
$[0-9]$[0-9]
$[0-9]$[0-9]$[0-9]
Prepending Numbers to a Password
[List.Rules:PrependNum]
#Prepends one, two, and three numbers to a password
^[0-9]
^[0-9]^[0-9]
^[0-9]^[0-9]^[0-9]
Appending Special Characters to Passwords
[List.Rules:AppendSpecialChar]
#Appends one, two, and three special character to a password
$[!@#$%^&*()+=.?]
$[!@#$%^&*()+=.?]$[!@#$%^&*()+=.?]
$[!@#$%^&*()+=.?]$[!@#$%^&*()+=.?]$[!@#$%^&*()+=.?]
Prepending Special Characters to a Password
[List.Rules:PrependSpecialChar]
#Prepends one, two, and three special character to a password
^[!@#$%^&*()+=.?]
^[!@#$%^&*()+=.?]^[!@#$%^&*()+=.?]
^[!@#$%^&*()+=.?]^[!@#$%^&*()+=.?]^[!@#$%^&*()+=.?]
Lowercasing the Password and Appending Numbers and Special Characters
[List.Rules:LowercaseNumChar]
#Lowercases all of the letters of the password and adds a number and/or special character to it
l
l$[0-9]
l$[0-9]$[0-9]
l$[!@#$%^&*()+=.?]
l$[!@#$%^&*()+=.?]$[!@#$%^&*()+=.?]
l$[0-9]$[!@#$%^&*()+=.?]
l$[0-9]$[0-9]$[!@#$%^&*()+=.?]$[!@#$%^&*()+=.?]
Uppercasing the Password and Appending Numbers and Special Characters
[List.Rules:UppercaseNumChar]
#Uppercases all of the letters of the password and adds a number and/or special character to it
u
u$[0-9]
u$[0-9]$[0-9]
u$[!@#$%^&*()+=.?]
u$[!@#$%^&*()+=.?]$[!@#$%^&*()+=.?]
u$[0-9]$[!@#$%^&*()+=.?]
u$[0-9]$[0-9]$[!@#$%^&*()+=.?]$[!@#$%^&*()+=.?]
Generating the Mutated Wordlist
When you are ready to generate the mutated wordlist, you will need to run the following: --wordlist=[path to the pre-mutated wordlist] --stdout --rules:[rule set name] > [path to the generated list]. You will need to invoke John the Ripper using the appropriate method for your operating system.
John the Ripper will generate the wordlist using the rules that you have specified. If you want to apply all the rules in the configuration file to the wordlist, you can just specify the --rules option.
Generating the Wordlist on Linux
./john --wordlist=[path to the wordlist] --stdout --rules:[rule set name] > [path to the generated list]
You must replace the brackets with the appropriate information. For example:
./john --wordlist=password.lst --stdout --rules:PrependSpecialChar > /home/usr/Desktop/mutatedpswds.lst
Generating the Wordlist on Windows
john --wordlist=[path to the wordlist] --stdout --rules:[rule set name] > [path to the generated list]
You must replace the brackets with the appropriate information. For example:
john --wordlist=password.lst --stdout --rules:PrependSpecialChar > /Desktop/mutatedpswds.lst
Importing John the Ripper Wordlists in to a Project
- Go the Manage Credentials screen.
- Click the Add button.
- When the Add Credentials window appears, select the Import option.
- Click the Browse button and navigate to the location of the wordlist you want to import.
The file must be a .txt or .lst file. - Select the file and click Open.
- From the Add Credentials window, select Wordlist as the format.
- Click the File Type dropdown and select Passwords.
- Enter tags for the passwords in the wordlist.(Optional)
Tags will help you easily search for and identify certain passwords.To enter a tag, start typing the name of the tag you want to use in the Tag field. As you type in the search box, Metasploit Pro automatically predicts the tags that may be similar to the ones you are searching for. If the tag does not exist, Metasploit Pro creates it.
- Click OK.
The wordlist is imported into the project. You can go to the Manage Credentials page to view the imported credentials.
Related Topics