Managing Campaigns
In Metasploit Pro, you create and run campaigns to perform social engineering attacks. A campaign contains the e-mails, web pages, and portable files that are necessary to run a social engineering attack against a group of targets. You can set up campaigns to perform phishing attacks, launch client-side exploits, run Java signed applets, generate executables for USB key drops, and send out e-mails with malicious attachments.
The campaign tracks the number of human targets that fall victim to the attack and presents the results in a social engineering report. You can read the report to review the metrics for the campaign, learn about remediation recommendations, and determine the effectiveness of the campaign. Additionally, the campaign page shows real-time statistics that provide you with a high-level overview of the campaign results. For example, you can view the number of recipients who opened the e-mail or filled out the web form in a phishing campaign.
A campaign is a logical grouping of the campaign components that you need to exploit or phish a group of people. A campaign can be comprised of the following campaign components: e-mail, web page, or portable file. The components that you add to the campaign depend on the purpose and goal of the social engineering attack.
Campaign Restrictions
The following restrictions apply to campaigns:
- A campaign can only contain one e-mail.
- A campaign that you build with the canned phishing campaign can only contain one e-mail and up to two web pages. One web page is used for the landing page, and the other web page is used for the redirect page. If you need additional redirect pages, do not use the canned phishing campaign to create a campaign, use the custom campaign builder instead.
- Each instance of Metasploit Pro can only run one campaign at a time.
Campaign Dashboard
The Campaign Dashboard contains the interfaces and tools that you need to set up social engineering campaigns. It provides you with access to the campaigns, target lists, and resource files that are in a project. The Campaign Dashboard is made up of the campaign tasks bar, modal windows, campaign widgets, and action links.
Campaign Tasks Bar
When you access the Campaign Dashboard, you will see the Campaign Tasks bar below the main Tasks bar. Each tab in the Campaign Tasks bar represents a major section of functionality within social engineering. Click on the tabs to switch to between the campaign configuration, campaign management, and campaign elements areas.
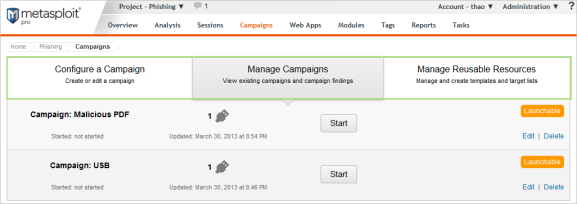
The Campaign Tasks bar contains the following tabs:
- Configure a Campaign - Displays the campaign editor. Use the campaign editor to create new campaigns and edit existing campaigns.
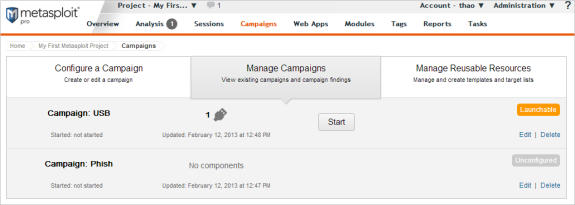
- Manage Campaigns - Shows a list of campaigns that are currently in the project. Next to each campaign listing is a set of action links. Use these action links to edit, delete, reset, preview, and start/stop a campaign.
- Manage Reusable Resources- Provides a management interface for reusable campaign resources, such as e-mail templates, web page templates, target lists, and malicious files.
Campaign Widgets
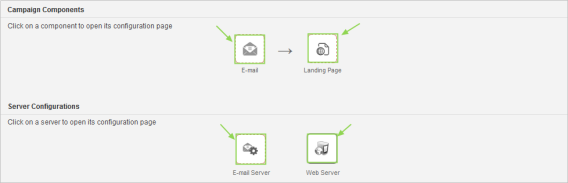
A campaign widget is an icon that represents a campaign component. When you click on the campaign widget, it opens a modal window that displays the configuration form for that campaign component.
Modal Windows
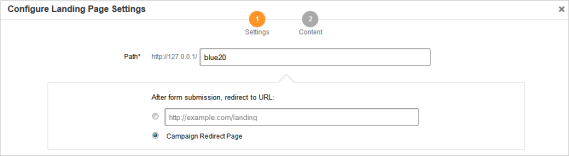
A modal window is a small pop-up window that requires you to interact with it before you can go back to the main window. Typically, modal windows are used to display alerts and confirmation windows. In Metasploit Pro, modal windows guide you through the process of setting up campaign components.
To exit a modal window, you must either complete the required form data, or you can click the ‘X’ to exit the screen.
Action Links
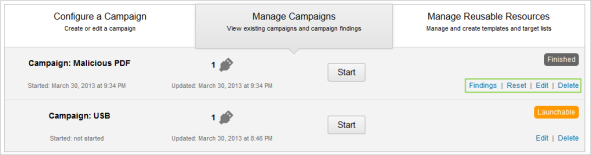
An action link is an interactive link that you can click on to perform a specific task. Each campaign has a set of action links that are available for you to use.
The following action links are available to each campaign:
- Start - Launch the campaign.
- Stop - Stop the campaign.
- Preview - Generate a preview of an e-mail and web page.
- Reset - Reset the statistics and data in a campaign.
- Edit - Edit the current configuration for campaign components.
- Delete - Remove the campaign and its data from the project.
The following image shows the action links that are available for a campaign:
Campaign States
The state describes the current status of a campaign. At any given point in time, a campaign can be in one of the following states:
- Unconfigured - The campaign does not contain any components or contains components that have not been configured.
- Preparing - The campaign is getting ready to run.
- Launchable - The campaign is ready to be launched.
- Running- The campaign is online.
For campaigns that have a web page, this means that the web page is online and accessible to target machines that can reach the Metasploit instance.
For campaigns that contain an e-mail, this means that Metasploit Pro has attempted to send the e-mail to the target list through your mail server.
For campaigns that contain portable files, this means that handler is ready and waiting for incoming connections from target machines.
- Finished- The campaign is no longer active.
For campaigns that have a web page, this means that the web page is no longer accessible and cannot be viewed by anyone.
For campaigns that contain portable files, this means that the handler is no longer listening for incoming connections.
Creating a Campaign
- From within a project, select Campaigns from the Tasks menu.
- When the Manage Campaigns area appears, click the Configure a Campaign tab.
- When the Configure a Campaign area appears, enter a name for the campaign in the Name field.
- Choose one of the following setup options:
- Phishing Campaign - Metasploit Pro automatically creates a campaign that has the necessary campaign components for a phishing attack. The phishing campaign contains an e-mail component and two web page components that you configure to set up the landing page and the redirect page.
- Custom Campaign - You manually create the campaign and add the campaign components that you need to it. For example, if you need to generate a portable file or generate a file format exploit.
Now you’re ready to customize the campaign. If the campaign is empty, you will need to add a component to it. For example, if you want to generate an executable to save to a USB key, you can add a portable file component.
Editing the Campaign Name
- From within a project, select Campaigns from the Tasks menu.
- When the Manage Campaigns area appears, find the campaign that you want to edit.
- Click the Edit link.
- When the campaign configuration page appears, delete the existing campaign name from the Name field.
- Enter the new campaign name in the Name field.
- Click the Save button.
Running a Campaign
- From within a project, click the Campaigns tab.
- When the Manage Campaigns area appears, find the campaign that you want to run. The campaign status must be launchable for the campaign to run. A launchable status indicates that all necessary components of the campaign are configured.
- Click the Start link.
Clearing the Data from a Campaign
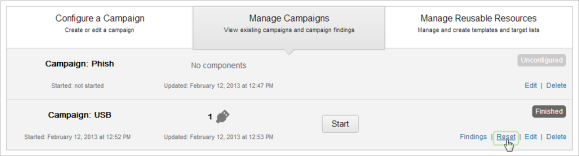
When you reset the campaign, you clear all the statistics and data collected by the campaign. A campaign reset removes any data collected through form submissions, the statistics for a phishing attack, and the statistics for e-mail tracking.
- From within a project, select Campaigns from the Tasks menu.
- When the Manage Campaigns area appears, find the campaign that you want to reset.
- Click the Reset link.
- When the confirmation window appears, click OK to confirm that you want to reset the data in the campaign.
Viewing the Findings for a Campaign
- From within a project, click the Campaigns tab.
- When the Manage Campaigns area appears, find the campaign whose results you want to view.
- Click the Findings link. The Findings window appears and displays the statistics for the entire campaign. You will see the total number human targets that received an e-mail, opened the e-mail, visited the phishing web page, and submitted the web page form.
- Click on a stat bubble to view the findings for that a list of human targets associated with that statistic.
For example, if you view the findings for the recipients who filled out the web form, you will see the name and e-mail of the human target that submitted the web form. If you click on their e-mail address, you will see the data that they submitted.
- Click the Done button to close the Findings window.
Adding a Campaign Component
- From within a project, click the Campaigns tab.
- When the Manage Campaigns area appears, find the campaign that you want to edit and click the Edit link.
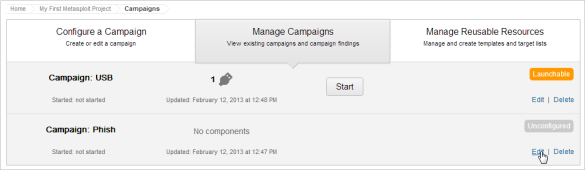
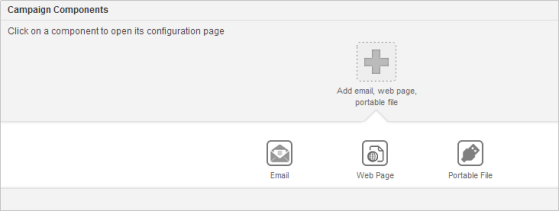
- When the campaign configuration page appears, click the Add e-mail, web page, or portable file button. You can only add components to a campaign that uses the custom setup. You cannot add components to a campaign that you created with the canned phishing campaign.
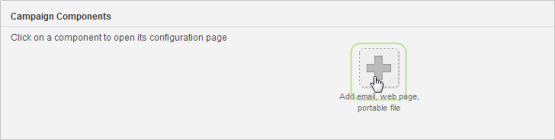
- Click on the campaign component that you want to add. After you add the component, the configuration page for the component appears. Follow the onscreen instructions to configure the component.
Removing a Campaign Component
- From within a project, click the Campaigns tab.
- When the Manage Campaigns area appears, find the campaign that you want to edit and click the Edit link.
- When the campaign configuration page appears, click the Edit button located under Campaign Components. The component icons show red X’s that you can use to remove a component from the campaign.
- Click the ‘X’ button for the component that you want to remove.
- Click the Done button when you finish.
Stopping a Campaign
- From within a project, click the Campaigns tab.
- When the Manage Campaigns area appears, find the campaign that you want to stop.
- Click the Stop link.
Sending an E-mail Notification when a Campaign Starts
Before you configure an e-mail notification, you should verify that the SMTP settings for your mail server have been configured for Metasploit Pro. Go to Administration > Global Settings to view your SMTP settings.
- From the campaign configuration form, locate the Notifications area.
- Select the Notify others before launching the campaign option.
- When the Notification Settings window appears, enter the e-mail addresses of the people who you want to send the alert in the To field. To include multiple e-mail addresses, use a comma separated list of e-mail addresses. For example, you can enter a list like the following: joe@rapid7.com, mary@rapid7.com, jon@rapid7.com.
- In the Subject field, enter the subject that you want the e-mail to display. By default, Metasploit Pro auto-fills the subject for you with a canned subject line.
- In the Message field, enter the information, or body, that you want to send in the e-mail. For example, you may want to say something like, “This is a company wide alert to inform you that we are starting our security awareness program. If you have any questions, please contact John Smith.”
- When you are done creating the notification e-mail, click the Save button.
Uploading a Malicious File
- From within a project, click the Campaigns tab.
- Click the Manage Reusable Resources tab.
- From the Resource dropdown, select Malicious Files.
- Click the New Malicious File button.
- In the File name field, enter the name of the file that you are importing. The file name must include the file extension. For example, if you are uploading an executable file, the file name should include the exe extension.
- Click the Browse button to navigate to the location of the file that you want to upload. Once you have found and selected the file, click the Open button. The path to the file will appear in the Attachment field.
- Click the Save button.
Deleting a Campaign
- From within a project, click the Campaigns tab.
- When the Manage Campaigns area appears, find the campaign that you want to delete.
- Click the Delete button.
- When the confirmation window appears, click OK to confirm that you want to permanently delete the campaign. All target lists and campaign components will be deleted from the project. You will no longer be able to view, run, or edit the campaign.
Exporting a CSV File of Campaign Findings
- From within a project, click the Campaigns tab.
- When the Manage Campaigns area appears, find the campaign that contains the data that you want to export.
- Click the Findings link.
- Click on the stat bubble that represents the data that you want to export. For example, if you want to export the list of human targets that opened the e-mail, click on the n% recipients opened the e-mail stat bubble. A list of human targets and the Export Data button appears.
- Click the Export Data button.
- When the Open window appears, choose the Save File option and click OK. The file saves to the Downloads folder on your system.
Exporting a CSV File of E-mail Sent from a Campaign
- From within a project, click the Campaigns tab.
- When the Manage Campaigns area appears, find the campaign that contains the data that you want to export.
- Click the Findings link.
- Click on the #n e-mails were sent stat bubble. A list of human targets and the Export Data button appears.
- Click the Export Data button.
- When the Open window appears, choose the Save File option and click OK. The file saves to the Downloads folder on your system.
Exporting a CSV File of Human Targets that Opened the E-mail
- From within a project, click the Campaigns tab.
- When the Manage Campaigns area appears, find the campaign that contains the data that you want to export.
- Click the Findings link.
- Click on the %n of recipients opened the e-mail stat bubble. A list of human targets and the Export Data button appears.
- Click the Export Data button.
- When the Open window appears, choose the Save File option and click OK. The file saves to the Downloads folder on your system.
Exporting a CSV File of Human Targets that Clicked on the Link
- From within a project, click the Campaigns tab.
- When the Manage Campaigns area appears, find the campaign that contains the data that you want to export.
- Click the Findings link.
- Click on the %n of openers clicked on linkstat bubble. A list of human targets and the Export Data button appears.
- Click the Export Data button.
- When the Open window appears, choose the Save File option and click OK. The file saves to the Downloads folder on your system.
Exporting a CSV File of Human Targets that Submitted the Form
- From within a project, click the Campaigns tab.
- When the Manage Campaigns area appears, find the campaign that contains the data that you want to export.
- Click the Findings link.
- Click on the %n of openers submitted the form stat bubble. A list of human targets and the Export Data button appears.
- Click the Export Data button.
- When the Open window appears, choose the Save File option and click OK. The file saves to the Downloads folder on your system.