
When configuring a report, you have a number of options related to how the information will be consumed and by whom. You can restrict report access to one user or a group of users. You can restrict sections of reports that contain sensitive information so that only specific users see these sections. You can control how reports are distributed to users, whether they are sent in e-mails or stored in certain directories. If you are exporting report information to external databases, you can specify certain properties related to the data export.
See the following sections for more information:
After a report is generated, only a Global Administrator and the designated report owner can see that report on the Reports page. You also can have a copy of the report stored in the report owner’s directory. See Storing reports in report owner directories.
If you are a Global Administrator, you can assign ownership of the report one of a list of users.
If you are not a Global Administrator, you will automatically become the report owner.
When the application generates a report, it stores it in the reports directory on the Security Console host:
[installation_directory]/nsc/reports/[user_name]/
You can configure the application to also store a copy of the report in a user directory for the report owner. It is a subdirectory of the reports folder, and it is given the report owner's user name.
Report File Storage
$(install_dir)/nsc/reports/$(user). Replace (user) with the report owner’s name.You can use string literals, variables, or a combination of these to create a directory path.
Available variables include:
$(date): the date that the report is created; format is yyyy-MM-dd$(time): the time that the report is created; format is HH-mm-ss$(user): the report owner’s user name$(report_name): the name of the report, which was created on the General section of the Create a Report panelAfter you create the path and run the report, the application creates the report owner’s user directory and the subdirectory path that you specified on the Output page. Within this subdirectory will be another directory with a hexadecimal identifier containing the report copy.
For example, if you specify the path windows_scans/$(date), you can access the newly created report at:
reports/[report_owner]/windows_scans/$(date)/[hex_number]/[report_file_name]
Consider designing a path naming convention that will be useful for classifying and organizing reports. This will become especially useful if you store copies of many reports.
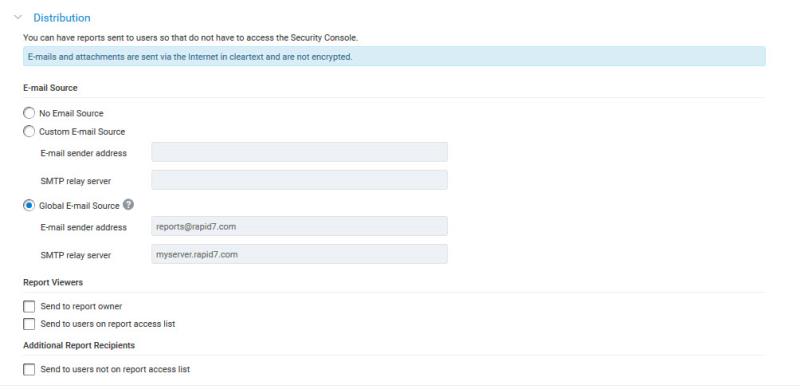
Another option for sharing reports is to distribute them via e-mail. Click the Distribution link in the left navigation column to go the Distribution page. See Managing the sharing of reports.
Every report has a designated owner. When a Global Administrator creates a report, he or she can select a report owner. When any other user creates a report, he or she automatically becomes the owner of the new report.
In the console Web interface, a report and any generated instance of that report, is visible only to the report owner or a Global Administrator. However, it is possible to give a report owner the ability to share instances of a report with other individuals via e-mail or a distributed URL. This expands a report owner’s ability to provide important security-related updates to a targeted group of stakeholders. For example, a report owner may want members of an internal IT department to view vulnerability data about a specific set of servers in order to prioritize and then verify remediation tasks.
Note: The granting of this report-sharing permission potentially means that individuals will be able to view asset data to which they would otherwise not have access.
Administering the sharing of reports involves two procedures for administrators:
Note: If a report owner creates an access list for a report and then copies that report, the copy will not retain the access list of the original report. The owner would need to create a new access list for the copied report.
Report owners who have been granted report-sharing permission can then create a report access list of recipients and configure report-sharing settings.
By default, URLs of shared reports are directed to the Security Console. To redirect users who click the distributed report URL link to the appropriate portal, you have to add an element to the oem.xml configuration file.
The element reportLinkURL includes an attribute called altURL, with which you can specify the redirect destination.
To specify a redirected URL:
[product_installation-directory]/nsc/conf. If the file does not exist, you can create the file.Note: If you are creating the oem.xml file, make sure to specify the
<reports>
<reportEmail>
<reportSender>account@exampleinc.com</reportSender>
<reportSubject>${report-name}
</reportSubject>
<reportMessage type="link">Your report (${report-name}) was generated on ${report-date}: ${report-url}
</reportMessage>
<reportMessage type="file">Your report (${report-name}) was generated on ${report-date}. See attached files.
</reportMessage>
<reportMessage type="zip">Your (${report-name}) was generated on ${report-date}. See attached zip file.
</reportMessage>
</reportEmail>
<reportLinkURL altURL="base_url.net/directory_path${variable}?loginRedir="/>
</reports>
Global Administrators automatically have permission to share reports. They can also assign this permission to others users or roles.
Assigning the permission to a new user involves the following steps.
(Optional) Go to the Users page and click New user.
Select any other permissions as desired.
To assign the permission to an existing user use the following procedure:
(Optional) Go to the Users page and click the Edit icon for one of the listed accounts.
Select any other permissions as desired.
Note: You also can grant this permission by making the user a Global Administrator.
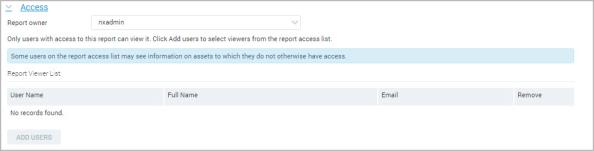
If you are a Global Administrator, or if you have been granted permission to share reports, you can create an access list of users when configuring a report. These users will only be able to view the report. They will not be able to edit or copy it.
To create a report access list with the Web-based interface, take the following steps:
If you are a Global Administrator or have Super-User permissions, you can select a report owner. Otherwise, you are automatically the report owner.
Report Access
A list of user accounts appears.
The selected users appear in the report access list.
Note: Adding a user to a report access list potentially means that individuals will be able to view asset data to which they would otherwise not have access.
Note: Before you distribute the URL, you must configure URL redirection.
You can share a report with your access list either by sending it in an e-mail or by distributing a URL for viewing it.
To share a report, use the following procedure:
Report Distribution
You may require an SMTP relay server for one of several reasons. For example, a firewall may prevent the application from accessing your network’s mail server. If you leave the SMTP relay server field blank, the application searches for a suitable mail server for sending reports. If no SMTP server is available, the Security Console does not send the e-mails and will report an error in the log files.
If a global e-mail source setting has been configured, you can choose between the global setting and creating a new custom e-mail source when creating or editing a report.
If you are a Global Administrator, you have the option to save the E-mail sender address and SMTP relay server as global settings. This means that this e-mail address and SMTP relay server can be selected and used for any reports distributed by e-mail. You can save the E-mail sender address and SMTP relay server settings as global from the report configuration, if none have already been saved, or from the Security Console administration page at any time. Navigate to Administration, then Administer next to Console, then SMTP.
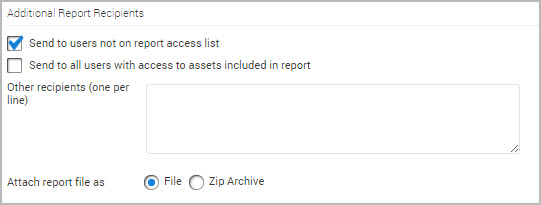
Additional Report Recipients
Adding a user to a report access list potentially means that individuals will be able to view asset data to which they would otherwise not have access.
Note: You cannot distribute a URL to users who are not on the report access list.
Note: This topic identifies the API elements that are relevant to creating report access lists and configuring report sharing. For specific instructions on using API v1.1 and Extended API v1.2, see the API guide, which you can download from the Support page in Help.
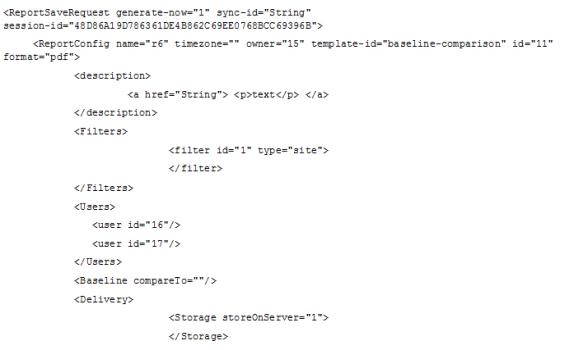
The elements for creating an access list are part of the ReportSave API, which is part of the API v1.1:
Users sub-element of ReportConfig, you can specify the IDs of the users whom you want add to the report access list.Enter the addresses of e-mail recipients, one per line.
Delivery sub-element of ReportConfig, you can use the sendToAclAs attribute to specify how to distribute reports to your selected users. Possible values include file, zip, or url.
To create a report access list:
Note: To obtain a list of users and their IDs, use the MultiTenantUserListing API, which is part of the Extended API v1.2.
For general information on accessing the API and a sample LoginRequest, see the section API overview in the API guide, which you can download from the Support page in Help.
For a LogoutRequest example, see the API guide.
For additional, detailed information about the ReportSave API, see the API guide.
Every report is based on a template, whether it is one of the preset templates that ship with the product or a customized template created by a user in your organization. A template consists of one or more sections. Each section contains a subset of information, allowing you to look at scan data in a specific way.
Security policies in your organization may make it necessary to control which users can view certain report sections, or which users can create reports with certain sections. For example, if your company is an Approved Scanning Vendor (ASV), you may only want a designated group of users to be able to create reports with sections that capture Payment Card Industry (PCI)-related scan data. You can find out which sections in a report are restricted by using the API (see the section SiloProfileConfig in the API guide.)
Restricting report sections involves two procedures:
Note: Only a Global Administrator can perform these procedures.
The sub-element RestrictedReportSections is part of the SiloProfileCreate API for new silos and SiloProfileUpdate API for existing silos. It contains the sub-element RestrictedReportSection for which the value string is the name of the report section that you want to restrict.
In the following example, the Baseline Comparison report section will become restricted.
For general information on accessing the API and a sample LoginRequest, see the section API overview in the API v1.1 guide, which you can download from the Support page in Help.

Note: To verify restricted report sections, use the SiloProfileConfig API. See the API guide.
For a LogoutRequest example, see the API guide.
The Baseline Comparison section is now restricted. This has the following implications for users who have permission to generate reports with restricted sections:
The restriction has the following implications for users who do not have permission to generate reports with restricted sections:
For additional, detailed information about the SiloProfile API, see API guide.
Global Administrators automatically have permission to generate restricted reports. They can also assign this permission to others users.
To assign the permission to a new user:
(Optional) Go to the Users page and click New user.
The console displays the Roles page.
Note: You also can grant this permission by making the user a Global Administrator.
Assigning the permission to an existing user involves the following steps.
OR
The console displays the Roles page.
If you selected Database Export as your report format, the Report Configuration—Output page contains fields specifically for transferring scan data to a database.
Before you type information in these fields, you must set up a JDBC-compliant database. In Oracle, MySQL, or Microsoft SQL Server, create a new database nexpose
Note: Currently, only PostgreSQL 9.4 or higher databases are supported as a warehousing target.
You can configure the Security Console to export data into an external data warehouse. You can use this feature to obtain a richer set data for integration with your own internal reporting systems, such as Business Intelligence tools. The export performs an extract, transform, and load (ETL) process into the target warehouse using a dimensional model.
You can view the schema for this model here.
The frequency of the ETL process to the external warehouse should be configured with your reporting needs in mind. The frequency of export matches the granularity of data points available for trending using historical fact tables. Due to the amount of data that can be exported, the warehousing process may take some time to complete. The recommended schedule setting is every 1 week. Care should be taken to schedule this export during non-critical scanning windows to minimize impact.
Data warehousing can be configured by a Global Administrator. Before configuring the Security Console settings, ensure that the destination warehouse database server has been configured (For more information, see Deploying and Configuring the Warehouse). To configure data warehouse export settings:
The following are recommended if you have an existing data warehouse configuration in place:
Change the Data model from Legacy to Dimensional: This will change the structure of the output schema to an easier to use and more comprehensively supported data model. You will be required to update any consumers of the warehouse to use the new model. When the new model is used, the existing schema elements will remain untouched, but no longer update during future ETL processes.
Enable encryption and identity validation: These settings were previously not supported, meaning any data in transit was not encrypted during the export process. Encryption of data in transit is recommend going forward, so you are encouraged to enable the Encrypt data in transit and Validate server identity settings. These changes will require a reconfiguration of SSL in the destination warehouse database. See "Deploying and Configuring the Warehouse" section for more information.
The dimensional warehouse schema is guaranteed to be backwards compatible when changes are made. The ETL process performed by the Security Console may periodically add additional data elements to the schema, but this will not cause any reports or queries against this schema to break in the future. The following will not be subject to change in the schema:
The following changes made be made in future iterations of the ETL process:
When changes are made to the model, applying a product upgrade and performing a new ETL process will upgrade the model in the target warehouse.
After the export process, the data warehouse is immediately available for reporting using any of: 1) direct connections; 2) a business intelligence tool; and/or 3) any additional custom tools/scripts or off-the-shelf software. During the export (ETL) process numerous DDL and DML queries are executed that manipulate the state of the warehouse. Consequently, the warehouse should not be accessed during this time period.
The data warehouse is a host running a PostgreSQL 9.4 or later database server. Management and configuration of the data warehouse server must be performed manually. The warehouse must be configured to support an external connection on the PostgreSQL database port, and allow ingress network traffic from the Security Console. Configuration of the warehouse for optimum performance varies based on the number of simultaneous connections needed, as well as the disk speed and available ram.
Hardware Requirements:
Follow these steps to install and configure a new data warehouse:
All PostgreSQL versions:
| Setting | 32 GB RAM | 72 GB RAM |
|---|---|---|
max_connections
|
10 | 20 |
shared_buffers
|
8 GB | 18 GB |
work_mem
|
419 MB | 471 MB |
maintenance_work_mem
|
2 GB | 2 GB |
checkpoint_segments
|
128 | 256 |
effective_cache_size
|
24 GB | 54 GB |
checkpoint_completion_target
|
0.9 | 0.9 |
wal_buffers
|
16 MB | 32 MB |
auto_vacuum
|
off | off |
PostgreSQL 9.6+:
Setting 32 GB or 72 GB RAM min_parallel_relation_size8 MB force_parallel_modeon max_worker_processesnumber of CPU cores * 2 max_parallel_workers_per_gathernumber of CPU cores / 2
- To enable SSL (and encryption of data in transit), acquire a certificate and enable the following in the postgresql.conf file:
ssl = onssl_ciphers = 'HIGH:MEDIUM:+3DES:!aNULL'ssl_cert_file = 'server.crt'ssl_key_file = 'server.key'password_encryption = on- Launch the postgreSQL process.