Integrating NSX network virtualization with scans
Virtual environments are extremely fluid, which makes it difficult to manage them from a security perspective. Assets go online and offline continuously. Administrators re-purpose them with different operating systems or applications, as business needs change. Keeping track of virtual assets is a challenge, and enforcing security policies on them is an even greater challenge.
The vAsset Scan feature addresses this challenge by integrating Nexpose scanning with the VMware NSX network virtualization platform. The integration gives a Scan Engine direct access to an NSX network of virtual assets by registering the Scan Engine as a security service within that network. This approach provides several benefits:
- The integration automatically creates a Nexpose site, eliminating manual site configuration.
- The integration eliminates the need for scan credentials. As an authorized security service in the NSX network, the Scan Engine does not require additional authentication to collect extensive data from assets.
- Security management controls in NSX use scan results to automatically apply security policies to assets, saving time for IT or security teams. For example, if a scan flags a vulnerability that violates a particular policy, NSX can quarantine the affected asset until appropriate remediation steps are performed.
Note: The vAsset Scan feature is a different feature and license option from vAsset Discovery, which is related to the creation of dynamic sites that can later be scanned. For more information about that feature, see Managing dynamic discovery of assets.
Activities in an NSX-integrated site
When you create a site through this NSX integration process, you cannot do the following actions in the Site Configuration:
- Edit assets, which are dynamically added as part of the integration process.
- Change the Scan Engine, which is automatically configured as part of the integration process.
- Change the assigned scan template, which is Full Audit.
- Add scan credentials, which are unnecessary because the integration provides Nexpose with the depth of access to target assets that credentials would otherwise provide.
Requirements for the vAsset Scan feature
To use the vAsset Scan feature, you need the following components:
- a Nexpose installation with the vAsset Scan feature enabled in the license
- VMware ESXi 5.5 hosts
- VMware vCenter Server 5.5
- VMware NSX 6.0 or 6.1
- Guest Introspection deployed
- VMware Tools installed with VMCI drivers
Deployment steps for the vAsset Scan feature
Deploying the vScan feature involves the following sequence of steps:
- Deploy the VMware Guest Introspection service
- Integrating NSX network virtualization with scans
- Download the Nexpose scan engine OVF
- Register Nexpose with NSX Manager
- Deploy the Scan Engine from NSX
- Create a security group
- Create a security policy
- Power on a Windows Virtual Machine
- Scan the security group
Deploy the VMware Guest Introspection service
- Log onto the VMware vSphere Web Client.
- From the Home menu, select Network & Security.
- From the Network & Security menu, select Installation.
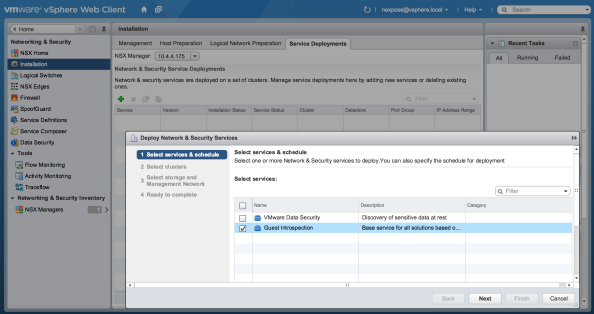
- In the Installation pane, select the Service Deployments tab. Click the green plus sign (
 ) and then select the check box for Guest Introspection. Then click the Next button to configure the deployment.

The vSphere Web Client-Select Services & Schedule pane
- In the Select clusters pane, select a datacenter and cluster to deploy the Guest Introspection on. Then click Next.
- In the Select storage pane, select a data store for the VMware Endpoint. Then click Next.
- In the Configure management network pane, select a network and IP assignment for the VMware Endpoint. Then click Next.
- In the Ready to complete pane, click Finish.
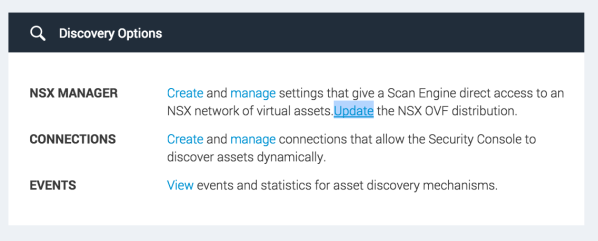
Download the Nexpose scan engine OVF
Click the Update link on the Administration page under NSX Manager.

Windows
If you are in a Windows environment, take the following steps:
- Verify that Nexpose is licensed for the Virtual Scanning feature:
- Click the Administration tab in the Nexpose Security Console.
- On the Administration page, under Global and Console Settings, select the Administer link for Console.
- In the Security Console Configuration panel, select Licensing.
- On the Licensing page, look at the list of license-supported features and that Virtual Scanning is marked with a green check mark.
- Verify the NexposeVASE.ovf file is accessible from the Security Console by typing the following URL in your browser:
https://[Security_Console_IP_address]:3780/nse/ovf/NexposeVASE.ovf.
Register Nexpose with NSX Manager
Nexpose must be registered with VMware NSX before it can be deployed into the virtual environment.
- Log onto the Nexpose Security Console.
Example: https://[IP_address_of_Virtual_Appliance]:3780
The default user name is nxadmin, and the default password is nxpassword.
- As a security best practice, change the default credentials immediately after logging on. To do so, click the Administration icon. On the Administration page, click the manage link next to Users. On the Users page, edit the default account with new, unique credentials, and click Save.
- On the Administration page, click the Create link next to NSX Manager to create a connection between Nexpose and NSX Manager.
- On the General page of the NSX Connection Manager panel, enter a connection name, the fully qualified domain name for the NSX Manager server, and a port number. The default port for NSX Manager is 443.

The Nexpose NSX Connection Manager panel-General page
- On the Credentials page of the NSX Connection Manager panel, enter credentials for Nexpose to use when connecting with NSX Manager.
- Select the Callback IP address from the drop down menu. If the Nexpose console has multiple IP addresses, select the IP that can be reached by the NSX Manager.
Note: These credentials must be created on NSX in advance, and the user must have the NSX Enterprise Administrator role.

The Nexpose NSX Connection Manager panel-Credentials page
Deploy the Scan Engine from NSX
This deployment authorizes the Scan Engine to run as a security service in NSX. It also automatically creates a site in Nexpose.
- Log onto the VMware vSphere Web Client.
- From the Home menu, select Network & Security.
- From the Network & Security menu, select Installation.
- From the Installation menu, select Service Deployments.
- In the Installation pane, click the green plus sign () and then select the check box for Rapid7 Nexpose Scan Engine. Then click the Next button to configure the deployment.
Configuring Scan Engine settings in NSX
- Select the cluster in which to deploy the Rapid7 Nexpose Scan Engine.
Note: One Scan Engine will be deployed to each host in the selected cluster.
- Configure the deployment according to your environment settings. Then click Finish.
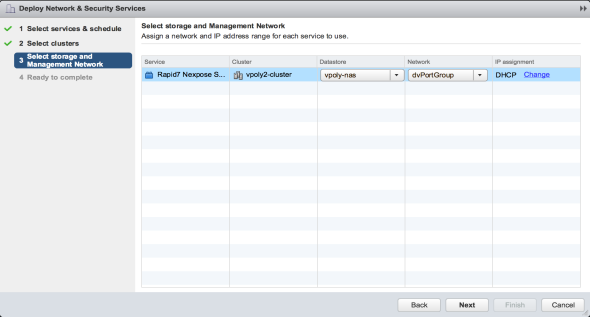
Configuring Scan Engine settings in NSX
Note: The Service Status will display Warning while the Scan Engine is initializing.
Create a security group
This procedure involves creating a group of virtual machines for Nexpose to scan. You will apply a security policy to this group in the following procedure.
- From the Home menu in vSphere Web Client, select Network & Security.
- From the Network & Security menu in vSphere Web Client, select Service Composer.
- In the Service Composer pane, click New Security Group.
- Create a security group. Use either dynamic criteria selection or enter individual virtual machine names.
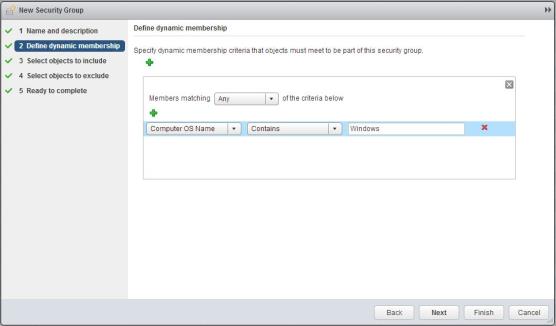
Creating a security group in NSX
Create a security policy
This new policy applies the Scan Engine as a Guest Introspection service for the security group.
- After you create a security group click, select it and click Apply Policy. Then, click the New Security Policy... link.
- Create a new security policy for the Rapid7 Nexpose Scan Engine Guest Introspection service, selecting the following settings:
- Action:Apply
- Service Type:Grayed out / not modifiable (may contain anti-virus)
- Service Name:Rapid7 Nexpose Scan Engine
- Service Profile: Rapid7 Nexpose Scan Engine_default (Vulnerability Management)
- Service Configuration:default
- State:Enabled
- Enforced:Yes
- Click OK.
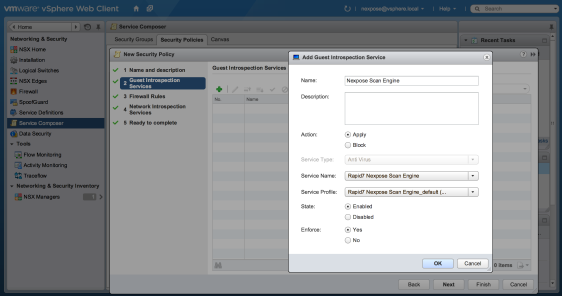
Creating a security policy in NSX
Power on a Windows Virtual Machine
This machine will serve as a scan target to verify that the integration is operating correctly.
- Power on a Windows Virtual Machine that has VMware Tools version 9.4.0 or later installed.
Scan the security group
The rules of the policy will be enforced within the security group based on scan results.
- Log onto the Nexpose Security Console.
- In the Site Listing table, find the site that was auto-created when you deployed the Scan Engine from NSX.
- Click the Scan icon to start the scan.
For information about monitoring the scan see
Running a manual scan.