It may not be unusual for your organization’s assets to fluctuate in number, type, and state, on a fairly regular basis. As staff numbers grow or recede, so does the number of workstations. Servers go on line and out of commission. Employees who are traveling or working from home plug into the network at various times using virtual private networks (VPNs).
This fluidity underscores the importance of having a dynamic asset inventory. Relying on a manually maintained spreadsheet is risky. There will always be assets on the network that are not on the list. And, if they’re not on the list, they're not being managed. Result: added risk.
One way to manage a "dynamic inventory," is to run discovery scans on a regular basis. See Configuring asset discovery. This approach is limited because scan provides a snapshot of your asset inventory at the time of the scan. Another approach, Dynamic Discovery, allows you to discover and track assets without running a scan. It involves initiating a connection with a server or API that manages an asset environment, such as one for virtual machines, and then receiving periodic updates about changes in that environment. This approach has several benefits:
The following types of Discovery Connections require the Dynamic Discovery option:
For McAfee Data Exchange Layer connections, your license must also enable the Adaptive Security option.
For ActiveSync connections that allow you to discover mobile devices, your license must enable the Mobile option.
To verify that your license enables Virtual Discovery:
The Security Console displays the Administration page.
The Security Console displays the Security Console Configuration panel.
The Security Console displays the Licensing page.
An increasing number of users are connecting their personal mobile devices to corporate networks. These devices increase and expand attack surfaces in your environment with vulnerabilities that allow attackers to bypass security restrictions and perform unauthorized actions or execute arbitrary code.
You can discover devices with Apple iOS or Google Android operating systems that are connected to Microsoft Exchange over ActiveSync. All versions of iOS and Android are supported.
The Security Console discovers mobile devices that are managed with Microsoft Exchange ActiveSync protocol. The Dynamic Discovery feature currently supports Exchange versions 2010 and 2013 and Office 365.
You can connect to the mobile data via one of three Microsoft Windows server configurations:
The advantage of using one of the WinRM configurations is that asset data discovered through one of these methods includes the most recent time that each mobile device was synchronized with the Exchange server. This can be useful if you do not want your reports to include data from old devices that are no longer in use on the network. You can create a dynamic asset group for mobile devices with old devices filtered out. See Performing filtered asset searches.
Depending on which Windows server configuration you are using, you will need to take some preliminary steps to prepare your target environment for discovery.
For the discovery connection, the Security Console requires credentials for a user with read permission on the mobile device objects in Active Directory. The user must be a member of the Organization Management Security Group in Microsoft Exchange or a user that has been granted read access to the mobile device objects.This allows the Security Console to perform LDAP queries.
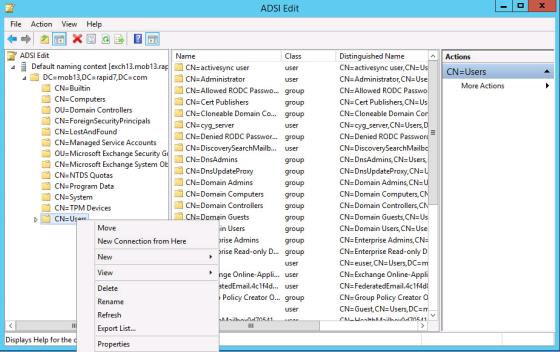
Take the following steps on the AD server to grant account Read-only permissions to the AD Organizational Unit(s) (OU) that contain users with ActiveSync (Mobile) devices:
Selecting the Users OU in ADSI Edit
Repeat the previous steps for any additional OUs containing ActiveSync (Mobile) devices.
The setup requirements and steps in the target environment are practically identical for PowerShell and Office 365 configurations:
Note: The WinRM gateway may also be the Exchange server or Nexpose, if the Security Console is running on Windows.
Note: Consult a Windows server administrator if you are unfamiliar with these procedures.
The WinRM gateway must have an available https WinRM listener at port 5986. Typical steps to enable this include the following:
C:\> winrm quickconfig -transport:https
[PS] C:\> set-item wsman:localhost\Shell\MaxMemoryPerShellMB 2048
C:\> netsh advfirewall firewall add rule name=
"Windows Remote Management (HTTPS-In)" dir=in action=allow protocol=TCP localport=5986
The following instructions are available for enabling WinRM for an account other than administrator: http://docs.scriptrock.com/kb/using-winrm-without-admin-rights.html
If WinRM fails using a domain controller as WinRM gateway, see the blog at http://www.projectleadership.net/blogs_details.php?id=3154 for assistance. Typically, running setspn -L [server_name] returns two WinRM configurations; but, in this case, none are displayed.
If the PowerShell script fails with error Process is terminated due to StackOverflowException., the WinRM memory limit is insufficient. Increase the setting by running the PowerShell command:
[PS] C:\> set-item wsman:localhost\Shell\MaxMemoryPerShellMB 2048
To verify and troubleshoot Exchange connectivty, open the PowerShell Windows WinRM gateway server with the WinRM credentials. Then run the following Powershell command with your Exchange user credentials and the Exchange server fully qualified domain name for your organization:
$cred = Get-Credential
$s = New-PSSession -ConfigurationName Microsoft.Exchange -ConnectionUri http://exchangeserver.domain.com/ -credential $cred
Import-PSSession $s
Get-ActiveSyncDevice
This will display a window to enter the credentials. If the New-PSSession fails this indicates that the remote PowerShell connection to the Exchange server failed.
If the Get-ActiveSyncDevices command returns not devices, this may indicate that your Exchange account has insufficient permission to perform the query.
The Office 365 configuration works exactly like the PowerShell configuration, except that it communicates with Microsoft's Exchange server in the Cloud and connects to the gateway somewhat differently via PowerShell.
Use the following script to troubleshoot Office365 exchange connectivity:
$cred = Get-Credential
$s = New-PSSession -ConfigurationName Microsoft.Exchange -ConnectionUri https://outlook.office365.com/powershell -credential $cred -Authentication Basic -AllowRedirection
Import-PSSession $s
Get-ActiveSyncDevice
After preparing your network for discovery, see Creating and managing Dynamic Discovery connections.
To optimize discovery results on a continuing basis, observe some best practices for managing your environment:
Test your ActiveSync environment to verify all components are working and communicating properly. This will help improve your coverage.
Creating rules for ActiveSync devices in your network further expands your control. You can, for example, create rules for approving quarantined devices.
Individual users in your organization may use multiple devices, each with its own partnership or set of ActiveSync attributes created during the initial synchronization. Additionally, users routinely upgrade from one version of a device to another, which also increases the potential number of partnerships to support. Managing these partnerships is important for tracking ActiveSync devices in your environment. It involves the removal of old devices from the Exchange server, which can help create a more accurate mobile risk assessment.
If your organization uses Amazon Web Services (AWS) for computing, storage, or other operations, Amazon may occasionally move your applications and data to different hosts. By initiating Dynamic Discovery of AWS instances and setting up dynamic sites, you can scan and report on these instances on a continual basis. The connection occurs via the AWS API.
In the AWS context, an instance is a copy of an Amazon Machine Image running as a virtual server in the AWS cloud. The scan process correlates assets based on instance IDs. If you terminate an instance and later recreate it from the same image, it will have a new instance ID. That means that if you scan a recreated instance, the scan data will not be correlated with that of the preceding incarnation of that instance. The results will be two separate instances in the scan results.
Before you initiate Dynamic Discovery and start scanning in an AWS environment, you need to:
When configuring your AWS connection, you can specify whether:
These configurations determine which additional settings and configurations you will need.
If your Security Console is located outside the AWS network, the AWS Application Programming Interface (API) must be able to recognize it as a trusted entity before allowing it to connect and discover AWS instances. To make this possible, you will need to create IAM user, which is an AWS identity for the Security Console, with permissions that support Dynamic Discovery. When you create an IAM user, you will also create an access key that the Security Console will use to log onto the API.
Learn about IAM users and how to create them.
Note: When you create an IAM user, make sure to select the option to create an access key ID and secret access key. You will need these credentials when setting up the discovery connection. You will have the option to download these credentials. Be careful to download them in a safe, secure location.
Note: When you create an IAM user, make sure to select the option to create a custom policy.
If your Security Console is installed on an AWS instance and, therefore, inside the AWS network, you need to create an IAM role for that instance. A role is simply a set of permissions. You will not need to create an IAM user or access key for the Security Console.
Learn about IAM users and how to create them.
Note: When you create an IAM role, make sure to select the option to create a custom policy.
When creating an IAM user or role, you will have to apply a policy to it. A policy defines your permissions within the AWS environment. Amazon requires your AWS policy to include minimal permissions for security reasons. To meet this requirement, select the option create a custom policy.
You can create the policy in JSON format using the editor in the AWS Management Console. The following code sample implements the minimum policy needed by Nexpose and indicates how the policy should be defined:
{
"Version": "2012-10-17",
"Statement": [
{ "Sid": "NexposeScanEngine", "Effect": "Allow", "Action":
[ "ec2:DescribeInstances", "ec2:DescribeImages", "ec2:DescribeAddresses" ], "Resource": [ "*" ] }
]
}
It is a best practice to scan AWS instances with a distributed Scan Engine that is deployed within the AWS network, also known as the Elastic Compute Cloud (EC2) network. This allows you to scan private IP addresses and collect information that may not be available with public IP addresses, such as internal databases.
If your Scan Engine is inside the AWS network, Nexpose will discover and scan assets using their private IPs.
Note: If the private IP space in your AWS network overlaps with the private IP space in your corporate network, some assets in AWS may share the same IP address as assets in your corporate network.
If your Scan Engine is outside the AWS network, Nexpose will only scan assets with Elastic IP (EIP) addresses assigned to them. Nexpose will use these EIPs when scanning. You will not be able to manually edit the asset list in your site configuration or in a manual scan window. Dynamic Discovery will include instances without EIP addresses, but they will not appear in the asset list for the site configuration.
An increasing number of high-severity vulnerabilities affect virtual targets and devices that support them, such as the following:
Merely keeping track of virtual assets and their various states and classifications is a challenge in itself. To manage their security effectively you need to keep track of important details: For example, which virtual machines have Windows operating systems? Which ones belong to a particular resource pool? Which ones are currently running? Having this information available keeps you in synch with the continual changes in your virtual asset environment, which also helps you to manage scanning resources more efficiently. If you know what scan targets you have at any given time, you know what and how to scan.
In response to these challenges the application supports dynamic discovery of virtual assets managed by VMware vCenter or ESX/ESXi.
Once you initiate Dynamic Discovery it continues automatically as long as the discovery connection is active.
To perform dynamic discovery in VMware environments, Nexpose can connect to either a vCenter server or directly to standalone ESX(i) hosts.
To determine if the application supports a connection to an ESX(i) host that is managed by vCenter, consult VMware’s interoperability matrix at http://partnerweb.vmware.com/comp_guide2/sim/interop_matrix.php.
The application supports direct connections to the following ESX(i) versions:
You must configure your VMware vSphere deployment to communicate through HTTPS. To perform Dynamic Discovery, the Security Console initiates connections to the vSphere application program interface (API) via HTTPS.
If Nexpose and your target vCenter or virtual asset host are in different subnetworks that are separated by a device such as a firewall, you will need to make arrangements with your network administrator to enable communication, so that the application can perform Dynamic Discovery.
Make sure that port 443 is open on the vCenter or virtual machine host because the application needs to contact the target in order to initiate the connection.
When creating a discovery connection, you will need to specify account credentials so that the application can connect to vCenter or the ESX/ESXi host. Make sure that the account has permissions at the root server level to ensure all target virtual assets are discoverable. If you assign permissions on a folder in the target environment, you will not see the contained assets unless permissions are also defined on the parent resource pool. As a best practice, it is recommended that the account have read-only access.
Make sure that virtual machines in the target environment have VMware Tools installed on them. Assets can be discovered and will appear in discovery results if they do not have VMware Tools installed. However, with VMware Tools, these target assets can be included in dynamic sites. This has significant advantages for scanning. See Configuring a site using a Dynamic Discovery connection.
This connection extends your visibility into your asset inventory by exposing assets that may not be otherwise apparent. Scan Engines query DHCP server logs, which dynamically update with fresh asset information every five seconds. The engines pass the results of these queries to the Security Console. For each DHCP connection, you assign a specific Scan Engine.
On first connection, the method will yield the current DHCP lease table. When initially established, the connection discovers assets in the current DHCP lease table. While the connection remains active, it continuously discovers new assets the DHCP server detects and existing assets that renew their IP addresses.
You can leverage the number of distributed Scan Engines to communicate with multiple DHCP servers and to connect with these servers in less accessible locations, such as behind firewalls or on the network perimeter.
Note: The DHCP method only discovers assets that have not yet been discovered by Nexpose through a different method or through a scan.
Two DHCP collection options are available:
Note: The current implementation of DHCP discovery with the Directory Watcher method supports Microsoft Server 2008 and 2012.
Make sure your Microsoft DHCP configuration enables logging. Also, it is strongly recommended that you move the log files to a directory that is separate from the DHCP database files. Microsoft DHCP stores log data in a separate file for each day of the week and overwrites each file on a weekly basis.
Tip: The default directory path of the DHCP log file is in Windows 2008 is %windir%\System32\Dhcp. The path in Windows 2012 is %systemroot%\System32\Dhcp.
The McAfee ePolicy Orchestrator connection allows Nexpose to collect information from McAfee ePolicy Orchestrator (ePO) about the assets it manages. Nexpose can scan the assets managed by ePO and provide additional vulnerability assessment. If configured with an McAfee Data Exchange Layer (DXL) discovery connection, it can monitor these assets for malicious file detection events and perform automated actions such as adding tags that can give you context you need to understand your risk and your next steps.You can also configure Nexpose to publish risk scores to an ePO dashboard and share its vulnerability information with McAfeeThreat Intelligence Exchange (TIE). To learn more about the DXL and TIE components, see Discovering vulnerability data collected by McAfee Data Exchange Layer (DXL).
Note: Assets are synchronized from ePO once per day.
McAfee ePolicy Orchestrator connections must be created from the Administration page. To learn more, see Creating a connection outside of a site configuration.
The recommended best practice is to connect all assets managed by ePO into a single static site, and then use dynamic asset groups to categorize and scan the assets. To learn more, see Using dynamic asset groups.
Note: In order to create an McAfee ePolicy Orchestrator connection, you will need to have a static site already configured. You can use an existing site or create a new one. If creating a new one, you may need to add an asset as a placeholder since the ePO connection will not be available yet.
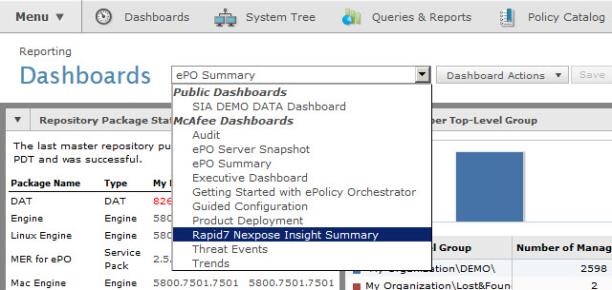
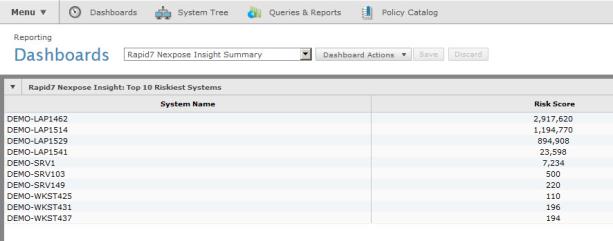
If the Rapid7 Nexpose extension is installed on the ePO server, a dashboard will be created in ePO. If an McAfee ePolicy Orchestrator connection is configured to push risk scores back to ePO as described in Creating and managing Dynamic Discovery connections, then once you scan the assets, this dashboard will show the top ten highest-risk assets managed by ePO, as determined by Nexpose's vulnerability assessment and risk scoring system.
To view the Rapid7 Nexpose Insight: Top 10 Riskiest Systems dashboard in McAfee ePolicy Orchestrator:
In order to discover assets managed by McAfee ePolicy Orchestrator with Nexpose, you must install the Rapid7 Nexpose extension in McAfee ePolicy Orchestrator. The extension can be downloaded from http://download2.rapid7.com/download/NeXpose-v4/epo-extension/Rapid7Nexpose.zip.
Once the extension is installed, a user called NexposeServiceUser will be automatically created. Enable this user and set a valid password to use in the connection from Nexpose.
This connection allows Nexpose to collect information from McAfee Data Exchange Layer about information discovered by Security McAfee Vulnerability Manager. Configuring an McAfee Data Exchange Layer discovery connection allows you to monitor malicious file detection events generated by McAfee Threat Intelligence Exchange (TIE). You can then set Nexpose Automated Actions to automatically tag the asset if the malicious file detection events occur. Applying a criticality tag with an automated action can automatically adjust the risk score of the asset and therefore potentially affect the list of highest-risk assets in the ePO dashboard. For more information, see Discovering assets managed by McAfee ePolicy Orchestrator on page 1.
McAfee Data Exchange Layer connections must be created outside a site configuration, from the Administration page. To learn more, see Creating a connection outside of a site configuration.
In order to use the McAfee Data Exchange Layer connection with Nexpose, you must install the Rapid7 Nexpose extension in McAfee ePolicy Orchestrator. The extension can be downloaded from http://download2.rapid7.com/download/NeXpose-v4/epo-extension/Rapid7Nexpose.zip.
Create a service user specifically designated for use with this connection. The user should be in an ePO permission set with the DXL McAfee MePO Certificate Creation permission assigned.
Note: When you save a DXL configuration, a service topic will be automatically created in the DXL fabric, since the Find details of a vulnerability setting is always on. When Nexpose is shut down for an hour, the service topic will be shut down – a new one will be created upon restarting Nexpose.
The Active Directory connection allows Nexpose to collect information from the catalog of assets in Active Directory. This reduces the effort for network administrators to keep the asset list in Nexpose updated. Nexpose also pulls in OS information from Active Directory where available, so you can create asset groups by the hostname and the OS, or automatically add newly discovered assets into existing asset groups.
Note: Assets are synchronized from Active Directory once per day.
Active Directory discovery connections must be created from the Administration page. To learn more, see Creating a connection outside of a site configuration.
Note: In order to create an Active Directory connection, you will need to have a static site already configured. You can use an existing site or create a new one. If creating a new one, you may need to add an asset as a placeholder since the Active Directory connection will not be available yet.
This action provides Nexpose the information it needs to contact a server or process that manages the asset environment.
You must have Global Administrator permissions to create or manage Dynamic Discovery connections. See Managing users and authentication.
If you want to create a connection while configuring a new site, click the Create site button on the Home page.
OR
Click the Create tab at the top of the page and then select Site from the drop-down list.
If you want to create a connection for an existing site, click that site's Edit icon in the Sites table on the Home page.

Selecting a discovery connection type
Enter the information for a new connection with Exchange ActiveSync (LDAP):
LDAPS, which is LDAP over SSL, is the more secure option and is recommended if it is enabled on your AD server.
This account will enable the Security Console to discover mobile devices connected to the AD server.
Note: Once you save credentials in this setting, changes will not take effect until you restart Nexpose.
Enter the information for a new connection with Exchange ActiveSync (WinRM/PowerS/hell or WinRM/Office 365):
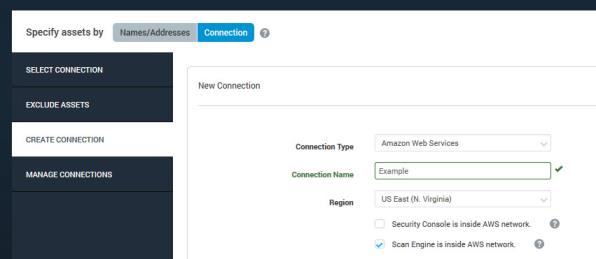
Enter the information for a new connection (AWS):

Setting up a connection with Nexpose Scan Engine inside the AWS network and Security Console outside
Enter the information for a new connection (VMware vSphere).
Enter the information for a new connection (DHCP-Directory Watcher).
Enter the information for a new connection (DHCP-Syslog).
Note: Syslog is the only available collection method for the Infoblox Trinzic event source.
The Security Console displays the General page of the Asset Discovery Connection panel.

Selecting a discovery connection type outside of a site configuration
The Security Console displays the Connection page.
LDAPS, which is LDAP over SSL, is the more secure option and is recommended if it is enabled on your AD server.
The Security Console displays the Credentials page.
This account will enable the Security Console to discover mobile devices connected to the AD server.
The Security Console displays the Connection page.
The Security Console displays the Credentials page.
The Security Console displays the Service page.
The Security Console displays the Credentials page.
Tip: If you create a connection and later change it to reference a different DHCP server, your asset discovery results will change. Therefore, if it is important to you to associate assets with specific DHCP servers in Nexpose, consider associating the name of the connection with the DHCP server and changing that name if you change the referenced server. Also, note that you cannot create duplicate DHCP connections.
Note: Syslog is the only available data collection method for the Infoblox Trinzic event source.
LDAPS, which is LDAP over SSL, is the more secure option and is recommended if it is enabled on your AD server.
Note: Once an Security McAfee Data Exchange Layer (DXL) connection has been saved, additional changes will not apply until the Nexpose Security Console is restarted. You can edit, test, and save the credential configuration but the changes will only be applied upon Nexpose Security Console restart. This also applies to deleting a connection; although the deleted connection will no longer appear in the Nexpose Security Console interface, you will not be able to create a new DXL connection with the same credential configuration until a Nexpose Security Console restart.
key: value + key: value +... If this box is empty, all assets are imported.key: value + key: value +... If this box is empty, all tags are imported.To view available connections or change a connection configuration take the following steps:
The Security Console displays the Discovery Connections page.
OR
The Security Console displays the Filtered asset discovery page.
The Security Console displays the Asset Discovery Connection panel
On the Discovery Connections page, you can also delete connections or export connection information to a CSV file, which you can view in a spreadsheet for internal purposes.
You cannot delete a connection that has a dynamic site or an in-progress scan associated with it. Also, changing connection settings may affect asset membership of a dynamic site. See Configuring a site using a Dynamic Discovery connection. You can determine which dynamic sites are associated with any connection by going to the Discovery Management page. See Monitoring Dynamic Discovery.
If you change a connection by using a different account, it may affect your discovery results depending which virtual machines the new account has access to. For example: You first create a connection with an account that only has access to all of the advertising department’s virtual machines. You then initiate discovery and create a dynamic site. Later, you update the connection configuration with credentials for an account that only has access to the human resources department’s virtual machines. Your dynamic site and discovery results will still include the advertising department’s virtual machines; however, information about those machines will no longer be dynamically updated. Information is only dynamically updated for machines to which the connecting account has access.
This action involves having the Security Console contact the server or API and begin discovering virtual assets. After the application performs initial discovery and returns a list of discovered assets, you can refine the list based on criteria filters, as described in the following topic. To perform Dynamic Discovery, you must have the Manage sites permission. See Configuring roles and permissions.
Note: This process does not apply to McAfee ePolicy Orchestrator, McAfee Data Exchange Layer, or Active Directory connections. With those connection types, discovery takes place automatically when you initiate the connection.
Nexpose establishes the connection and performs discovery. A table appears and lists information about each discovered asset.
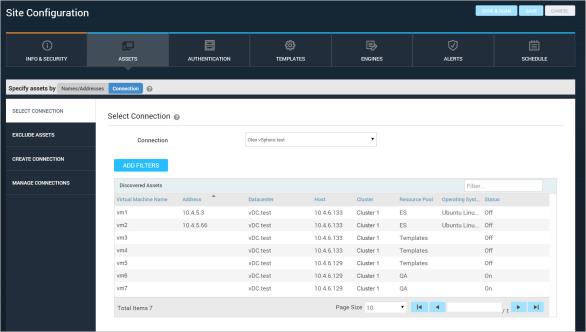
Assets displayed in a VMware connection
Note: Assets discovered through a dynamic connection also appear on the Assets page. See Comparing scanned and discovered assets
The Security Console displays the General page of the Asset Discovery Connection panel.
Note: With new, changed, or reactivated discovery connections, the discovery process must complete before new discovery results become available. There may be a slight delay before new results appear in the Web interface.
Nexpose establishes the connection and performs discovery. A table appears and lists the following information about each discovered asset.
For mobile devices, the table includes the following:
For AWS connections, the table includes the following:
For VMware connections, the table includes the following:
For DHCP connections, the table includes the following:
After performing the initial discovery, the application continues to discover assets as long as the discovery connection remains active. The Security Console displays a notification of any inactive discovery connections in the bar at the top of the Security Console Web interface. You can also check the status of all discovery connections on the Discovery Connections page. See Creating and managing Dynamic Discovery connections.
If you create a discovery connection but don’t initiate discovery with that connection, or if you initiate a discovery but the connection becomes inactive, you will see an advisory icon in the top, left corner of the Web interface page. Roll over the icon to see a message about inactive connections. The message includes a link that you can click to initiate discovery.
After Nexpose discovers assets, they also appear in the Discovered by Connection table on the Assets page. See Locating and working with assets for more information.
You can use filters to refine Dynamic Discovery results based on specific discovery criteria. For example, you can limit discovery to assets that are managed by a specific resource pool or those with a specific operating system.
Note: This process does not apply to McAfee ePolicy Orchestrator, McAfee Data Exchange Layer, or Active Directory connections.
Note: If a set of filters is associated with a dynamic site, and if you change filters to include more assets than the maximum number of scan targets in your license, you will see an error message instructing you to change your filter criteria to reduce the number of discovered assets.
Using filters has a number of benefits. You can limit the sheer number of assets that appear in the discovery results table. This can be useful in an environment with a high number of virtual assets. Also, filters can help you discover very specific assets. You can discover all assets within an IP address range, all assets that belong to a particular resource pool, or all assets that are powered on or off. You can combine filters to produce more granular results. For example, you can discover all of Windows 7 virtual assets on a particular host that are powered on.
For every filter that you select, you also select an operator that determines how that filter is applied. Then, depending on the filter and operator, you enter a string or select a value for that operator to apply.
You can create dynamic sites based on different sets of discovery results and track the security issues related to these types of assets by running scans and reports. See Configuring a site using a Dynamic Discovery connection.
Three filters are available for mobile device connections:
With the Operating System filter, you can discover assets based on their operating systems. This filter works with the following operators:
With the User filter, you can discover assets based on their associated user accounts. This filter works with the following operators:
Note: This filter is only available with WinRM/PowerShell and WinRM/Office 365 Dynamic Discovery connections.
With the Last Synch Time filter, you can track mobile devices based on the most recent time they synchronized with the Exchange server. This filter can be useful if you do not want your reports to include data from old devices that are no longer in use on the network. It works with the following operators.
Eight filters are available for AWS connections:
With the Availability Zone filter, you can discover assets located in specific Availability Zones. This filter works with the following operators:
With the Guest OS family filter, you can discover assets that have, or do not have, specific operating systems. This filter works with the following operators:
With the Instance ID filter, you can discover assets that have, or do not have, specific Instance IDs. This filter works with the following operators:
With the Instance Name filter, you can discover assets that have, or do not have, specific Instance IDs. This filter works with the following operators:
With the Instance state filter, you can discover assets (instances) that are in, or are not in, a specific operational state. This filter works with the following operators:
Instance states include Pending, Running, Shutting down, Stopped, or Stopping.
With the Instance type filter, you can discover assets that are, or are not, a specific instance type. This filter works with the following operators:
Instance types include c1.medium, c1.xlarge,c3.2xlarge, c3.4xlarge, or c3.8xlarge.
Note: Dynamic Discovery search results may also include m1.small or t1.micro instance types, but Amazon does not currently permit scanning of these types.
With the IP address filter, you can discover assets that match or do not have a specific IP address, or that have IP addresses, or do not have IP addresses, within a specific range. This filter works with the following operators:
When you select the is in the range of or is not in the range of filters, you will see two blank fields separated by the word to. You use the left field to enter the start of the IP address range, and use the right to enter the end of the range.
The format for IPv4 addresses is a “dotted quad.” Example:
192.168.2.1 to 192.168.2.254
You can combine multiple search types in your query to focus on very specific assets. For instance, you can search for IP addresses in the range 192.168.2.1 to 192.168.2.254, but exclude 192.168.2.7 and 192.168.2.199.
With the Region type filter, you can discover assets that are in, or are not in, a specific geographic region. This filter works with the following operators:
Regions include Asia Pacific (Singapore), Asia Pacific (Sydney), Asia Pacific (Tokyo), EU (Ireland), or South American (Sao Paulo).
Eight filters are available for VMware connections:
With the Cluster filter, you can discover assets that belong, or don’t belong, to specific clusters. This filter works with the following operators:
With the Datacenter filter, you can discover assets that are managed, or are not managed, by specific datacenters. This filter works with the following operators:
With the Guest OS family filter, you can discover assets that have, or do not have, specific operating systems. This filter works with the following operators:
With the Host filter, you can discover assets that are guests, or are not guests, of specific host systems. This filter works with the following operators:
With the IP address filter, you can discover assets that match or do not have a specific IP address, or that have IP addresses, or do not have IP addresses, within a specific range. This filter works with the following operators:
When you select the is in the range of or is not in the range of filters, you will see two blank fields separated by the word to. You use the left field to enter the start of the IP address range, and use the right to enter the end of the range.
With the Power state filter, you can discover assets that are in, or are not in, a specific power state. This filter works with the following operators:
Power states include on, off, or suspended.
With the Resource pool path filter, you can discover assets that belong, or do not belong, to specific resource pool paths. This filter works with the following operators:
You can specify any level of a path, or you can specify multiple levels, each separated by a hyphen and right arrow: ->. This is helpful if you have resource pool path levels with identical names.
For example, you may have two resource pool paths with the following levels:
Human Resources
Management
Workstations
Advertising
Management
Workstations
The virtual machines that belong to the Management and Workstations levels are different in each path. If you only specify Management in your filter, the application will discover all virtual machines that belong to the Management and Workstations levels in both resource pool paths.
However, if you specify Advertising -> Management -> Workstations, the application will only discover virtual assets that belong to the Workstations pool in the path with Advertising as the highest level.
With the Virtual machine name filter, you can discover assets that have, or do not have, a specific name. This filter works with the following operators:
Three filters are available for VMware connections:
With the Host filter, you can discover assets based on host names. This filter works with the following operators:
With the IP address filter, you can discover assets that match or do not have a specific IP address, or that have IP addresses, or do not have IP addresses, within a specific range. This filter works with the following operators:
When you select the is in the range of or is not in the range of filters, you will see two blank fields separated by the word to. You use the left field to enter the start of the IP address range, and use the right to enter the end of the range.
With the MAC address filter, you can discover assets based on MAC addresses. This filter works with the following operators:
If you use multiple filters, you can have the application discover assets that match all the criteria specified in the filters, or assets that match any of the criteria specified in the filters.
The difference between these options is that the all setting only returns assets that match the discovery criteria in all of the filters, whereas the any setting returns assets that match any given filter. For this reason, a search with all selected typically returns fewer results than any.
For example, a target environment includes 10 assets. Five of the assets run Ubuntu, and their names are Ubuntu01, Ubuntu02, Ubuntu03, Ubuntu04, and Ubuntu05. The other five run Windows, and their names are Win01, Win02, Win03, Win04, and Win05. Suppose you create two filters. The first discovery filter is an operating system filter, and it returns a list of assets that run Windows. The second filter is an asset filter, and it returns a list of assets that have “Ubuntu” in their names.
If you discover assets with the two filters using the all setting, the application discovers assets that run Windows and have “Ubuntu” in their asset names. Since no such assets exist, no assets will be discovered. However, if you use the same filters with the any setting, the application discovers assets that run Windows or have “Ubuntu” in their names. Five of the assets run Windows, and the other five assets have “Ubuntu” in their names. Therefore, the result set contains all of the assets.
Note: If a virtual asset doesn’t have an IP address, it can only be discovered and identified by its host name. It will appear in the discovery results, but it will not be added to a dynamic site. Assets without IP addresses cannot be scanned.
After you initiate discovery as described in the preceding section, and the Security Console displays the results table, take the following steps to configure and apply filters:
A filter row appears.
A new filter row appears. Set up the new filter as described in the preceding step.
After you configure the filters, you can apply them to the discovery results.
Or, click Reset to clear all filters and start again.
The discovery results table now displays assets based on filtered discovery.
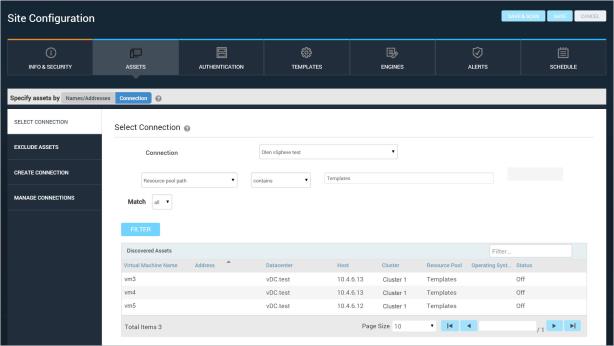
Applying Dynamic Discovery filters within a site configuration
Note: Assets discovered through McAfee ePolicy Orchestrator connections are not virtual and therefore appear in the regular Assets list.
Since discovery is an ongoing process as long as the connection is active, you may find it useful to monitor events related to discovery. The Discovery Statistics page includes several informative tables:
Dynamic Discovery is not meant to enumerate the host types of virtual assets. The application categorizes each asset it discovers as a host type and uses this categorization as a filter in searches for creating dynamic asset groups. See Performing filtered asset searches. Possible host types include Virtual machine and Hypervisor. The only way to determine the host type of an asset is by performing a credentialed scan. So, any asset that you discover through Dynamic Discovery and do not scan with credentials will have an Unknown host type, as displayed on the scan results page for that asset. Dynamic discovery only finds virtual assets, so dynamic sites will only contain virtual assets.
Note: Listings in the Events table reflect discovery over the preceding 30 days.
To monitor Dynamic Discovery, take the following steps:
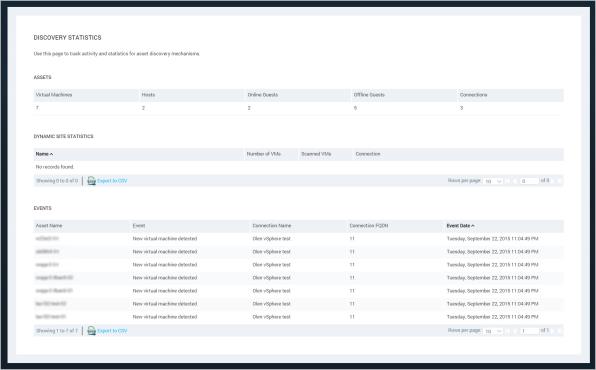
Viewing discovery statistics
To create a dynamic site you must meet the following prerequisites:
Note: This process does not apply to McAfee ePolicy Orchestrator or McAfee Data Exchange Layer connections.
If you attempt to create a site based on a number of discovered assets that exceeds the maximum number of scan targets in your license, you will see an error message instructing you to change your filter criteria to reduce the number of discovered assets. See Using filters to refine Dynamic Discovery.
Note: When you create a site using a Dynamic Discovery connection, all assets that meet the site’s filter criteria will not be correlated to assets that are part of existing sites. An asset that is listed in two sites is essentially regarded as two assets from a license perspective.
After creating and initiating a discovery connection, you can continue configuring a site.
For many types of Dynamic Discovery connections, as long as the connection is active, asset membership in a the site is subject to change whenever changes occur in the target environment.
Note: Types of connections whose sites can change dynamically in this way include connections to Amazon Web Services, DHCP log servers, and VMware servers. Due to the way assets are discovered through McAfee ePolicy Orchestrator (ePO) and McAfee Data Exchange Layer (DXL), sites using those types of connections will not update dynamically in this way. To learn more, see Discovering assets managed by McAfee ePolicy Orchestrator.
You can also change asset membership by changing the discovery connection or filters. See Using filters to refine Dynamic Discovery.
To view and change asset membership:
Whenever a change occurs in the target discovery environment, such as new virtual machines being added or removed, that change is reflected in the dynamic site asset list. This keeps your visibility into your target environment current.
Another benefit is that if the number of discovered assets in the dynamic site list exceeds the number of maximum scan targets in your license, you will see a warning to that effect before running a scan. This ensures that you do not run a scan and exclude certain assets. If you run a scan without adjusting the asset count, the scan will target assets that were previously discovered. You can adjust the asset count by refining the discovery filters for your site.
If you change the discovery connection or discovery filter criteria for a dynamic site that has been scanned, asset membership will be affected in the following ways: All assets that have not been scanned and no longer meet new discovery filter criteria, will be deleted from the site list. All assets that have been scanned and have scan data associated with them will remain on the site list whether or not they meet new filter discovery criteria. All newly discovered assets that meet new filter criteria will be added to the dynamic site list.