You can use Nexpose to perform credentialed scans on assets that authenticate users with SSH public keys.
This method, also known as asymmetric key encryption, involves the creation of two related keys, or large, random numbers:
When generating a key pair, keep the following guidelines in mind:
This topic provides general steps for configuring an asset to accept public key authentication. For specific steps, consult the documentation for the particular system that you are using.
The ssh-keygen process will provide the option to enter a pass phrase. It is recommended that you use a pass phrase to protect the key if you plan to use the key elsewhere.
This example involves a 2048-bit RSA key and incorporates the /tmp directory, but you should use any directory that you trust to protect the file.
ssh-keygen -t rsa -b 2048 -f /tmp/id_rsa
This command generates the private key files, id_rsa, and the public key file, id_rsa.pub.
mkdir /home/[username]/.ssh
Note: Some checks require root access.
Append the contents on the target asset of the /tmp/id_rsa.pub file to the .ssh/authorized_keys file in the home directory of a user with the appropriate access-level permissions that are required for complete scan coverage.
cat /[directory]/id_rsa.pub >> /home/[username]/.ssh/authorized_keys
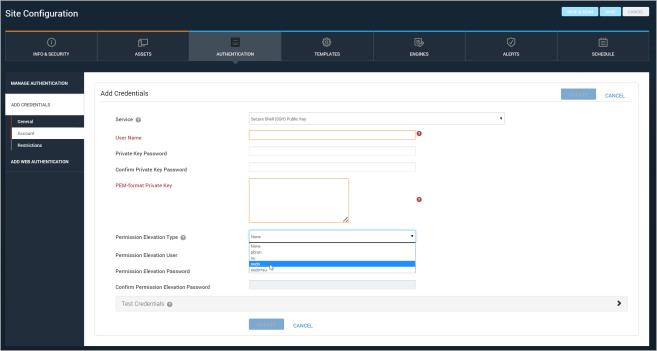
After you provide the private key you must provide the application with SSH public key authentication.
If you want to add SSH credentials while configuring a new site, click the Create site button on the Home page.
OR
Click the Create tab at the top of the page and then select Site from the drop-down list.
If you want to add SSH credentials for an existing site, click that site's Edit icon in the Sites table on the Home page.
Note: ssh/authorized_keys is the default file for most OpenSSH- and Drop down-based SSH daemons. Consult the documentation for your Linux distribution to verify the appropriate file.
This authentication method is different from the method listed in the drop-down as Secure Shell (SSH). This latter method incorporates passwords instead of keys.
You can elevate permissions for both Secure Shell (SSH) and Secure Shell (SSH) Public Key services.
sudo and the permission elevation user needs to be set as root. If the SSH credential provided is a root credential, user ID =0, the permission elevation credentials will be ignored, even if the root account has been renamed. The application will ignore the permission elevation credentials when any account, root or otherwise named, with user ID 0 is specified.
SSH Public Key configuration
For additional optional steps, see the following topics: