In this topic:
In this topic, you will learn how set up and test credentials for a site, how to restrict them to a specific asset or port, and how to edit and enable the use of previously created credentials.
When configuring scan credentials in a site, you have two options:
Note: To learn about credential types, see Shared credentials vs. site-specific credentials.
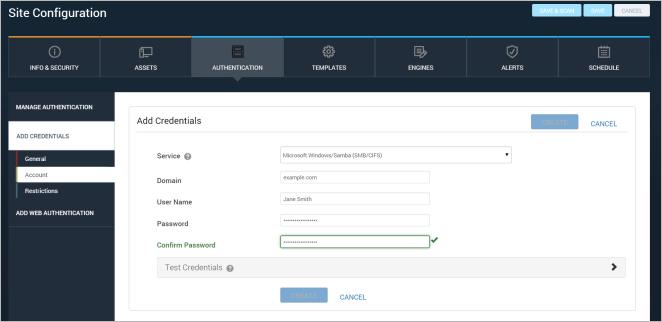
The first action in creating new site-specific scan credentials is naming and describing them. Think of a name and description that will help you recognize at a glance which assets the credentials will be used for. This will be helpful, especially if you have to manage many sets of credentials.
If you want to add credentials while configuring a new site, click the Create site button on the Home page.
OR
Click the Create tab at the top of the page and then select Site from the drop-down list.
If you want to add credentials for an existing site, click that site's Edit icon in the Sites table on the Home page.
Note: If you created the site through the integration with VMware NSX, you cannot edit scan credentials, which are unnecessary because the integration provides Nexpose with the depth of access to target assets that credentials would otherwise provide. See Integrating NSX network virtualization with scans.
If you do not know what authentication service to select or what credentials to use for that service, consult your network administrator.
Note: All credentials are protected with RSA encryption and triple DES encryption before they are stored in the database.
Configuring an account for site credentials
The newly created credentials appear in the Scan Credentials table, which you can view by clicking Manage Authentication.
You can verify that a target asset in your site will authenticate the Scan Engine with the credentials you’ve entered. It is a quick method to ensure that the credentials are correct before you run the scan.
Note: If you do not enter a port number, the Security Console will use the default port for the service. For example, the default port for CIFS is 445.
Note: If you are testing Secure Shell (SSH) or Secure Shell (SSH) Public Key credentials and you have assigned elevated permissions, both credentials will be tested. Credentials for authentication on the target are tested first, and a message appears if the credentials failed. Permission elevation failures are reported in a separate message. See Using SSH public key authentication.
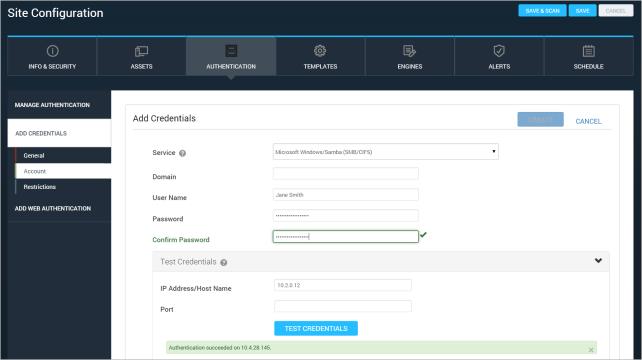
A successful test of site credentials
If a particular set of credentials is only intended for a specific asset and/or port, you can restrict the use of the credentials accordingly. Doing so can prevent scans from running unnecessarily longer due to authentication attempts on assets that don’t recognize the credentials.
If you restrict credentials to a specific asset and/or port, they will not be used on other assets or ports.
Specifying a port allows you to limit your range of scanned ports in certain situations. For example, you may want to scan Web applications using HTTP credentials. To avoid scanning all Web services within a site, you can specify only those assets with a specific port.
OR
Enter host name or IP address of the asset and the number of the port that you want to restrict the credentials to.
Note: If you do not enter a port number, the Security Console will use the default port for the service. For example, the default port for CIFS is 445.
Tip: To verify successful scan authentication on a specific asset, search the scan log for that asset. If the message “A set of [service_type] administrative credentials have been verified.” appears with the asset, authentication was successful.
If a set of credentials is not enabled for a site, the scan will not attempt authentication on target assets with those credentials. Make sure to enable credentials if you want to use them.
The Scan Credentials table lists any site-specific credentials that were created for the site or any shared credentials that were assigned to the site. For more information, see Shared credentials vs. site-specific credentials.
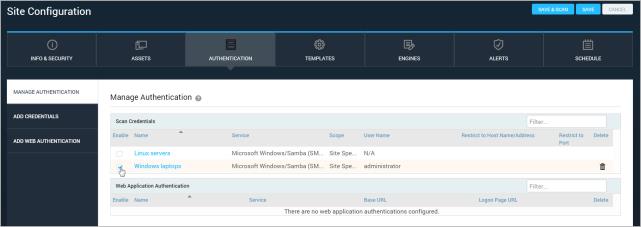
Enabling a set of credentials for a site
Note: You cannot edit shared scan credentials in the Site Configuration panel. To edit shared credentials, go to the Administration page and select the manage link for Shared scan credentials. See Editing shared credentials that were previously created. You must be a Global Administrator or have the Manage Site permission to edit shared scan credentials.
The ability to edit credentials can be very useful, especially if passwords change frequently. You can only edit site-specific credentials in a Site Configuration panel.
The Security Console will bring you to the Node Page.
In the Authentication column, the security console will display one of the following notes to determine the status of your credential authentication: