Analyzing the vulnerabilities discovered in scans is a critical step in improving your security posture. By examining the frequency, affected assets, risk level, exploitability and other characteristics of a vulnerability, you can prioritize its remediation and manage your security resources effectively.
Every vulnerability discovered in the scanning process is added to vulnerability database. This extensive, full-text, searchable database also stores information on patches, downloadable fixes, and reference content about security weaknesses. The application keeps the database current through a subscription service that maintains and updates vulnerability definitions and links. It contacts this service for new information every six hours.
The database has been certified to be compatible with the MITRE Corporation’s Common Vulnerabilities and Exposures (CVE) index, which standardizes the names of vulnerabilities across diverse security products and vendors. The index rates vulnerabilities according to MITRE’s Common Vulnerabilities Scoring System (CVSS) Version 2.
An application algorithm computes the CVSS score based on ease of exploit, remote execution capability, credentialed access requirement, and other criteria. The score, which ranges from 1.0 to 10.0, is used in Payment Card Industry (PCI) compliance testing. For more information about CVSS scoring, go to the FIRST Web site (http://www.first.org/cvss/cvss-guide.html).
Viewing vulnerabilities and their risk scores helps you to prioritize remediation projects. You also can find out which vulnerabilities have exploits available, enabling you to verify those vulnerabilities. See Using Exploit Exposure.
Click the Vulnerabilities icon that appears on every page of the console interface.
The Security Console displays the Vulnerabilities page, which lists all the vulnerabilities for assets that the currently logged-on user is authorized to see, depending on that user’s permissions. Since Global Administrators have access to all assets in your organization, they will see all the vulnerabilities in the database.
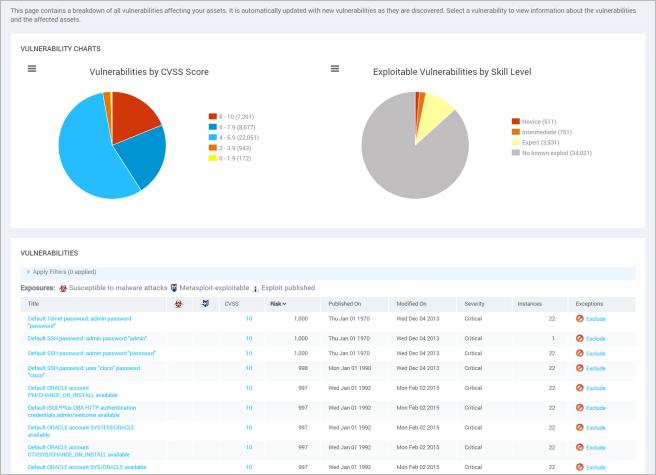
The Vulnerabilities page
The charts on the Vulnerabilities page display your vulnerabilities by CVSS score and exploitable skill levels. The CVSS Score chart displays how many of your vulnerabilities fall into each of the CVSS score ranges. This score is based on access complexity, required authentication, and impact on data. The score ranges from 1 to 10, with 10 being the worst, so you should prioritize the vulnerabilities with the higher numbers.
The Exploitable Vulnerabilities by Skill Level chart shows you your vulnerabilities categorized by the level of skill required to exploit them. The most easily exploitable vulnerabilities present the greatest threat, since there will be more people who possess the necessary skills, so you should prioritize remediating the Novice-level ones and work your way up to Expert.
You can change the sorting criteria by clicking any of the column headings in the Vulnerability Listing table.
The Title column lists the name of each vulnerability.
Two columns indicate whether each vulnerability exposes your assets to malware attacks or exploits. Sorting entries according to either of these criteria helps you to determine at a glance which vulnerabilities may require immediate attention because they increase the likelihood of compromise.
For each discovered vulnerability that has at least one malware kit (also known as an exploit kit) associated with it, the console displays a malware exposure icon  . If you click the icon, the console displays the Threat Listing pop-up window that lists all the malware kits that attackers can use to write and deploy malicious code for attacking your environment through the vulnerability. You can generate a comma-separated values (CSV) file of the malware kit list to share with others in your organization. Click the Export to CSV icon
  . Depending on your browser settings, you will see a pop-up window with options to save the file or open it in a compatible program.
You can also click the Exploits tab in the pop-up window to view published exploits for the vulnerability.
In the context of the application a published exploit is one that has been developed in Metasploit or listed in the Exploit Database (www.exploit-db.com).
For each discovered vulnerability with an associated exploit the console displays a exploit icon. If you click this icon the console displays the Threat Listing pop-up window that lists descriptions about all available exploits, their required skill levels, and their online sources. The Exploit Database  is an archive of exploits and vulnerable software. If a Metasploit exploit is available, the console displays the
  ™ icon and a link to a Metasploit module that provides detailed exploit information and resources.
There are three levels of exploit skill: Novice, Intermediate, and Expert. These map to Metasploit's seven-level exploit ranking. For more information, see the Metasploit Framework page (http://www.metasploit.com/redmine/projects/framework/wiki/Exploit_Ranking).
You can generate a comma-separated values (CSV) file of the exploit list and related data to share with others in your organization. Click the Export to CSV icon  . Depending on your browser settings, you will see a pop-up window with options to save the file or open it in a compatible program.
You can also click the Malware tab in the pop-up window to view any malware kits that attackers can use to write and deploy malicious code for attacking your environment through the vulnerability.
The CVSS Score column lists the score for each vulnerability.
The Published On column lists the date when information about each vulnerability became available.
The Risk column lists the risk score that the application calculates, indicating the potential danger that each vulnerability poses to an attacker exploits it. The application provides two risk scoring models, which you can configure. See Selecting a model for calculating risk scores in the administrator's guide. The risk model you select controls the scores that appear in the Risk column. To learn more about risk scores and how they are calculated, see the PCI, CVSS, and risk scoring FAQs, which you can access in the Support page.
The application assigns each vulnerability a severity level, which is listed in the Severity column. The three severity levels—Critical, Severe, and Moderate—reflect how much risk a given vulnerability poses to your network security. The application uses CVSS scores to rate severity. See the PCI, CVSS, and risk scoring FAQs, which you can access in the Support page.
Note: The severity ranking in the Severity column is not related to the severity score in PCI reports.
1 to 3 = Moderate
4 to 7 = Severe
8 to 10 = Critical
The Instances column lists the total number of instances of that vulnerability in your site. If you click the link for the vulnerability name, you can view which specific assets are affected by the vulnerability. See Viewing vulnerability details.
You can click the icon in the Exclude column for any listed vulnerability to exclude that vulnerability from a report.
An administrative change to your network, such as new credentials, may change the level of access that an asset permits during its next scan. If the application previously discovered certain vulnerabilities because an asset permitted greater access, that vulnerability data will no longer be available due to diminished access. This may result in a lower number of reported vulnerabilities, even if no remediation has occurred. Using baseline comparison reports to list differences between scans may yield incorrect results or provide more information than necessary because of these changes. Make sure that your assets permit the highest level of access required for the scans you are running to prevent these problems.
The Solution column links to the recommended solution to remediate the vulnerability. The pill icon represents the status of the solution. In most cases, one best solution will have been identified, and clicking the pill icon will take you directly to the recommended solution. Occasionally, there may be more than one possible best solution, depending on your environment. In this case, the icon will change appearance and clicking it will take you to a list of the potential solutions. Below are the potential states of the solutions:
| Icon | Meaning |

|
The application was able to identify a single best solution for this vulnerability on this asset. |

|
The application identified multiple potential best solutions. A human judgment call is needed to identify the best solution for your environment. |

|
Error state. This should appear rarely, but can occur in certain situations, such as if the vulnerability was deprecated, or the console has been decommissioned and is not taking updates. |
The Vulnerability Categories and Vulnerability Check Types tables list all categories and check types that the Application can scan for. Your scan template configuration settings determine which categories or check types the application will scan for. To determine if your environment has a vulnerability belonging to one of the listed checks or types, click the appropriate link. The Security Console displays a page listing all pertinent vulnerabilities. Click the link for any vulnerability to see its detail page, which lists any affected assets.
Your scans may discover hundreds, or even thousands, of vulnerabilities, depending on the size of your scan environment. A high number of vulnerabilities displayed in the Vulnerability Listing table may make it difficult to assess and prioritize security issues. By filtering your view of vulnerabilities, you can reduce the sheer number of those displayed, and restrict the view to vulnerabilities that affect certain assets. For example, a Security Manager may only want to see vulnerabilities that affect assets in sites or asset groups that he or she manages. Or you can restrict the view to vulnerabilities that pose a greater threat to your organization, such as those with higher risk scores or CVSS rankings.
Filtering your view of vulnerabilities involves selecting one or more filters, which are criteria for displaying specific vulnerabilities. For each filter you then select an operator, which controls how the filter is applied.
Site name is a filter for vulnerabilities that affect assets in specific sites. It works with the following operators:
Asset group name is a filter for vulnerabilities that affect assets in specific asset groups. It works with the following operators:
CVE ID is a filter for vulnerabilities based on the CVE ID. The CVE identifiers (IDs) are unique, common identifiers for publicly known information security vulnerabilities. For more information, see https://cve.mitre.org/cve/identifiers/index.html. The filter applies a search string to the CVE IDs, so that the search returns vulnerabilities that meet the specified criteria. It works with the following operators:
After you select an operator, you type a search string for the CVE ID in the blank field.
CVSS score is a filter for vulnerabilities with specific CVSS rankings. It works with the following operators:
After you select an operator, enter a score in the blank field. If you select the range operator, you would enter a low score and a high score to create the range. Acceptable values include any numeral from 0.0 to 10. You can only enter one digit to the right of the decimal. If you enter more than one digit, the score is automatically rounded up. For example, if you enter a score of 2.25, the score is automatically rounded up to 2.3.
Risk score is a filter for vulnerabilities with certain risk scores. It works with the following operators:
After you select an operator, enter a score in the blank field. If you select the range operator, you would type a low score and a high score to create the range. Keep in mind your currently selected risk strategy when searching for assets based on risk scores. For example, if the currently selected strategy is Real Risk, you will not find assets with scores higher than 1,000. Learn about different risk score strategies. Refer to the risk scores in your vulnerability and asset tables for guidance.
Vulnerability category is a filter that lets you search for vulnerabilities based on the categories that have been flagged on them during scans. Lists of vulnerability categories can be found in the scan template configuration or the report configuration.
The filter applies a search string to vulnerability categories, so that the search returns a list of vulnerabilities that either are or are not in categories that match that search string. It works with the following operators:
After you select an operator, you type a search string for the vulnerability category in the blank field.
Vulnerability title is a filter that lets you search vulnerabilities based on their titles.The filter applies a search string to vulnerability titles, so that the search returns a list of assets that either have or do not have the specified string in their titles. It works with the following operators:
After you select an operator, you type a search string for the vulnerability name in the blank field.
Note: You can only use each filter once. For example, you cannot select the Site name filter twice. If you want to specify more than one site name or asset name in the display criteria, use the SHIFT key to select multiple names when configuring the filter.
To apply vulnerability display filters, take the following steps:
The Security Console displays the Vulnerabilities page.
The Security Console displays vulnerabilities that meet all filter criteria in the table.
Currently, filters do not change the number of displayed instances for each vulnerability.
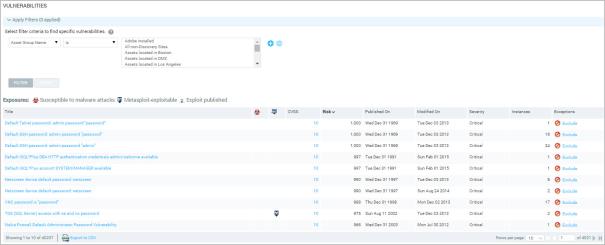
Filtering the display of vulnerabilities
Tip: You can export the filtered view of vulnerabilities as a comma-separated values (CSV) file to share with members of your security team. To do so, click the Export to CSV link at the bottom of the Vulnerability Listing table.
Click the link for any vulnerability listed on the Vulnerabilities page to view information about it. The Security Console displays a page for that vulnerability.
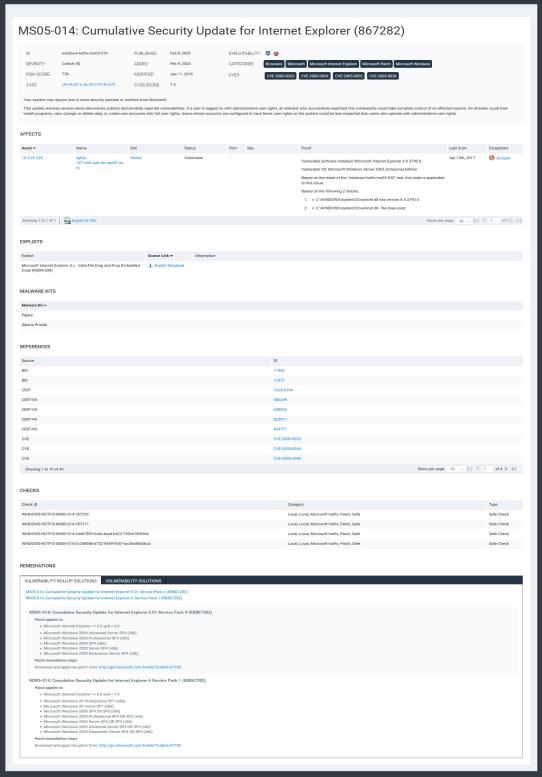
The page for a specific vulnerability
At the top of the page is a header containing details about the vulnerability. These include a description of the vulnerability, its severity level and CVSS rating, the date that information about the vulnerability was made publicly available , CVSS and risk scores, vulnerability categories, Common Vulnerabilities and Exposures (CVEs), if available, and the most recent date that Rapid7 modified information about the vulnerability, such as its remediation steps, CVSS and risk scores, vulnerability categories, and Common Vulnerabilities and Exposures (CVEs), if available.
Below these items is a table listing each affected asset, port, and the site on which a scan reported the vulnerability. You can click on the link for the device name or address to view all of its vulnerabilities.
The Port column in the Affected Assets table lists the port that the application used to contact the affected service or software during the scan. The Status column lists a Vulnerable status for an asset if the application confirmed the vulnerability. It lists a Vulnerable Version status if the application only detected that the asset is running a version of a particular program that is known to have the vulnerability.
The Proof column lists the method that the application used to detect the vulnerability on each asset. It uses exploitation methods typically associated with hackers, inspecting registry keys, banners, software version numbers, and other indicators of susceptibility.
The Exploits table lists descriptions of available exploits and their online sources. The Exploit Database is an archive of exploits and vulnerable software. If a Metasploit exploit is available, the console displays the  ™ icon and a link to a Metasploit module that provides detailed exploit information and resources.
The Malware table lists any malware kit that attackers can use to write and deploy malicious code for attacking your environment through the vulnerability. This table is not displayed if there is no known malware for the vulnerability.
The References table, which appears below the Affects pane, lists links to Web sites that provide comprehensive information about the vulnerability.
At the very bottom of the page is the Remediations pane, which lists remediation steps and links for downloading patches and fixes. This pane includes two tabs:
When you view the vulnerabilities page for an asset, there will be additional tabs that categorize the vulnerabilities by relevance to that asset.
If you wish to query the database for a specific vulnerability, and you know its name, type all or part of the name in the Search box that appears on every page of the console interface, and click the magnifying glass icon. The console displays a page of search results organized by different categories, including vulnerabilities.
There are many ways to sort and prioritize vulnerabilities for remediation. One way is to give higher priority to vulnerabilities that have been validated, or proven definitively to exist. The application uses a number of methods to flag vulnerabilities during scans, such as fingerprinting software versions known to be vulnerable. These methods provide varying degrees of certainty that a vulnerability exists. You can increase your certainty that a vulnerability exists by exploiting it, which involves deploying code that penetrates your network or gains access to a computer through that specific vulnerability.
As discussed in the topic Viewing active vulnerabilities, any vulnerability that has a published exploit associated with it is marked with a Metasploit or Exploit Database icon. You can integrate Rapid7 Metasploit as a tool for validating vulnerabilities discovered in scans and then have Nexpose indicate that these vulnerabilities have been validated on specific assets.
Note: Metasploit is the only exploit application that the vulnerability validation feature supports. See a tutorial for performing vulnerability validation with Metasploit.
To work in Nexposewith vulnerabilities that have been validated with Metasploit, take the following steps:
The Security Console displays the details page for the asset.
View the Exploits column ( ) in the Vulnerabilities table.
 icon.
icon.If a vulnerability has been validated with an exploit published in the Exploit Database, the column displays the  icon.
icon.
As seen in the following screen shot, the descending sort order for this column is 1) vulnerabilities that have been validated with a Metasploit exploit, 2) vulnerabilities that can be validated with a Metasploit exploit, 3) vulnerabilities that have been validated with an Exploit database exploit, 4) vulnerabilities that can be validated with an Exploit database exploit.
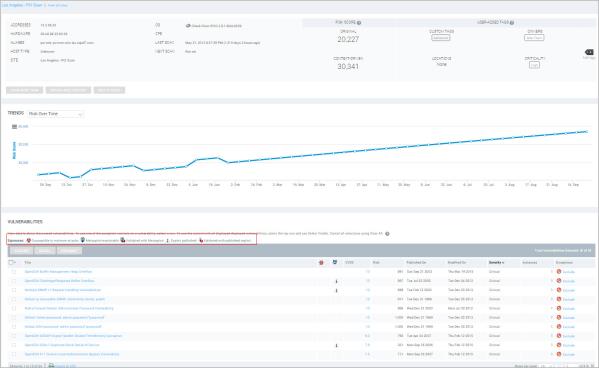
The asset details page with the Exposures legend highlighted