By viewing and sorting asset information based on scans, you can perform quick assessments of your environment and any security issues affecting it.
Tip: While it is easy to view information about scanned assets, it is a best practice to create asset groups to control which users can see which asset information in your organization. See Using asset groups to your advantage.
You can view all discovered assets that you have access to by simply clicking the Assets icon and viewing the Assets table on the Assets page.
The number of all discovered assets to which you have access appears at the top of the page, as well as the number of sites, asset groups, and tagged assets to which you have access.
Note: If you are using a Dynamic Discovery connection, such as mobile, AWS, VMware, or DHCP, the total asset count includes assets that have been discovered as well as those that have been assessed.
Also near the top of the page are pie charts displaying aggregated information about the assets in the Assets table below. With these charts, you can see an overview of your vulnerability status as well as interact with that data to help prioritize your remediations.

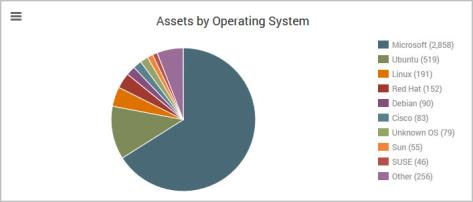
Assets by Operating System
The Assets by Operating System chart shows how many assets are running each operating system. You can mouse over each section for a count and percentage of each operating system. You can also click on a section to drill down to a more detailed breakdown of that category. For more information on this functionality, see Locating assets by operating systems.
Exploitable Assets by Skill Level
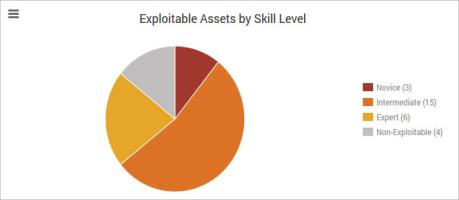
On the Exploitable Assets by Skill Level chart, your assets with exploitable vulnerabilities are classified according to skill level required for exploits. Novice-level assets are the easiest to exploit, and therefore the ones you want to address most urgently. Assets are not counted more than once, but are categorized according to the most exploitable vulnerability on the asset. For example, if an asset has a Novice-level vulnerability, two Intermediate-level vulnerabilities, and one Expert-level vulnerability, that asset will fall into the Novice category. Assets without any known exploits appear in the Non-Exploitable slice.
Note: A similar pie chart appears on the Vulnerabilities page, but that one classifies the individual vulnerabilities rather than the assets. For more information, see Working with vulnerabilities.
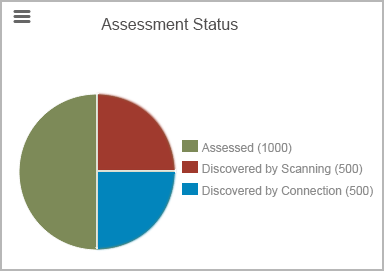
A third pie chart shows the numbers of assets that have been assessed for vulnerabilities and policy compliance as well as those that have been discovered and not yet assessed, either by scan or Dynamic Discovery connection.
Assessment status
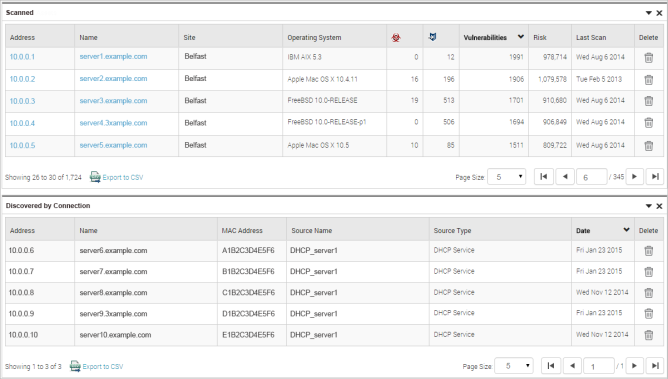
If you use Dynamic Discovery (see Managing dynamic discovery of assets on page 1), the Assets page displays two separate asset tables.
One lists assets that have been scanned.
The other table lists assets that have been discovered through a Dynamic Discovery connection. These latter assets have yet to be scanned for vulnerabilities or policy compliance. After any of these latter assets are scanned for the first time, they are removed from the Discovered by Connection table and displayed in the Scanned table.
Note: IP addresses are not listed for mobile devices. Instead the column displays the value Mobile device for each of these assets.
If you have created at least one discovery connection but you have not initiated a connection to actually discover assets, the Discovered by Connection appears with no assets listed.
Viewing assets that have been discovered but not yet assessed is a good way to expose areas in your environment that may have unknown security issues.
Note: The Discovered by Connection table does not list assets that have been scanned with a discovery scan. Those assets appear in the Scanned table.
The assets tables
You can sort assets in the Assets table by clicking a row heading for any of the columns. For example, click the top row of the Risk column to sort numerically by the total risk score for all vulnerabilities discovered on each asset.
You can generate a comma-separated values (CSV) file of the asset kit list to share with others in your organization. Click the Export to CSV  . Depending on your browser settings, you will see a pop-up window with options to save the file or open it in a compatible program.
You can control the number of assets that appear in each table by selecting a value in the Rows per page dropdown list in the bottom, right frame of the table. Use the navigation options in that area to view more asset records.
To view assets by sites to which they have been assigned, click the hyperlinked number of sites displayed at the top of the Assets page. The Security Console displays the Sites page. From this page you can create a new site.
If a scan is in progress for any site, a column labeled Scan Status appears in the table. To view information about that scan, click the Scan in progress link. If no scans are in progress, a column labeled Last Scan appears in the table. Click the date link in the Last Scan column for any site to view information about the most recently completed scan for that site.
Click the link for any site in the Site Listing pane to view its assets. The Security Console displays a page for that site, including recent scan information, statistical charts and graphs.
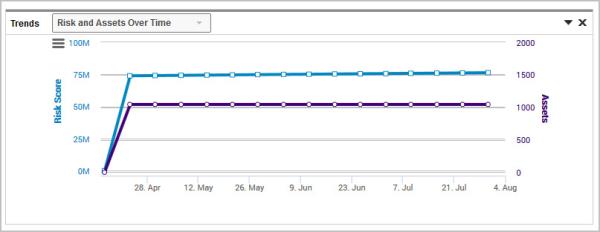
Site Summary trend chart
The Site Summary page displays trending chart as well as a scatter plot. The default selection for the trend chart matches the Home page – risk and assets over time. You can also use the drop down menu to choose to view Vulnerabilities over time for this site. This vulnerabilities chart will populate with data starting from the time that you installed the August 6, 2014 product update. If you recently installed the update, the chart will show limited data now, but additional data will be gathered and displayed over time.
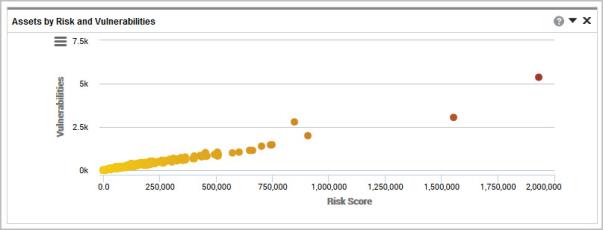
Assets by Risk and Vulnerabilities
The scatter plot chart permits you to easily spot outliers so you can spot assets that have above average risk. Assets with the highest amount of risk and vulnerabilities will appear outside of the cluster. The position and colors also indicate the risk associated with the asset by the asset's risk score - the further to the right and redder the color, the higher the risk. You can take action by selecting an asset directly from the chart, which will transfer you to the asset level view.
If a site has more 7,000 assets, a bubble chart view first appears which allows you to select a group of assets to then refine your view by selecting a bubble and showing the scatter plot for that bubble.
The Assets table shows the name and IP address of every scanned asset. If your site includes IPv4 and IPv6 addresses, the Address column groups these addresses separately. You can change the order of appearance for these address groups by clicking the sorting icon  in the Address column.
Note: IP addresses are not listed for mobile devices. Instead the column displays the value Mobile device for each of these assets.
In the Assetstable, you can view important security-related information about each asset to help you prioritize remediation projects: the number of available exploits, the number of vulnerabilities, and the risk score.
You will see an exploit count of 0 for assets that were scanned prior to the January 29, 2010, release, which includes the Exploit Exposure feature. This does not necessarily mean that these assets do not have any available exploits. It means that they were scanned before the feature was available. For more information, see Using Exploit Exposure.
From the details page of an asset, you can manage site assets and create site-level reports. You also can start a scan for that asset.
To view information about an asset listed in the Assets table, click the link for that asset. See Viewing the details about an asset.
To view assets by asset groups in which they are included, click the hyperlinked number of asset groups displayed at the top of the Assets page. The Security Console displays the Asset Groups page.
Charts and graphs at the top of the Asset Groups page provide a statistical overview of asset groups, including risks and vulnerabilities. From this page you can create a new asset group. See Using asset groups to your advantage.
Click the link for any group in the Scanned table to view its assets. The Security Console displays a page for that asset group, including statistical charts and graphs and a list of assets. In the Assets pane, you can view the scan, risk, and vulnerability information about any asset. You can click a link for the site to which the asset belongs to view information about the site. You also can click the link for any asset address to view information about it. See Viewing the details about an asset.
To view assets by the operating systems running on them, see the Assets by Operating System chart or table on the Assets page.
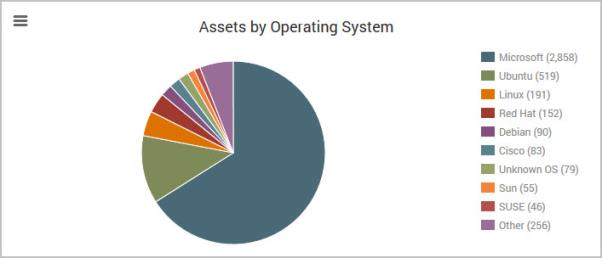
Assets by Operating System
The Assets by Operating System pie chart offers drill down functionality, meaning you can select an operating system to view a further breakdown of the category selected. For example, if Microsoft is selected for the OS you will then see a listing of all Windows OS versions present, such as Windows Server 2008, Windows Server 2012, and so on. Continuing to click on wedges further breaks down the systems to specific editions and service packs, if applicable. A large number of unknowns in your chart indicates that those assets were not fingerprinted successfully and should be investigated.
Note: If your assets have more than 10 types of operating systems, the chart shows the nine most frequently found operating systems, and an Other category. Click the Other wedge to see the remaining operating systems.
The Assets by Operating System table lists all the operating systems running in your network and the number of instances of each operating system. Click the link for an operating system to view the assets that are running it.The Security Console displays a page that lists all the assets running that operating system. You can view scan, risk, and vulnerability information about any asset. You can click a link for the site to which the asset belongs to view information about the site. You also can click the link for any asset address to view information about it. See Viewing the details about an asset.
To view assets by the software running on them, see the Software Listing table on the Assets page. The table lists any software that the application found running in your network, the number of instances of program, and the type of program.
The application only lists software for which it has credentials to scan. An exception to this would be when it discovers a vulnerability that permits root/admin access.
Click the link for a program to view the assets that are running it.
The Security Console displays a page that lists all the assets running that program. You can view scan, risk, and vulnerability information about any asset. You can click a link for the site to which the asset belongs to view information about the site. You also can click the link for any asset address or name to view information about it. See Viewing the details about an asset.
To view assets by the services they are running, see the Service Listing table on the Assets page. The table lists all the services running in your network and the number of the number of instances of each service. Click the link for a service to view the assets that are running it. See Viewing the details about an asset.
Regardless of how you locate an asset, you can find out more information about it by clicking its name or IP address.
The Security Console displays a page for each asset determined to be unique. Upon discovering a live asset, Nexpose uses correlation heuristics to identify whether the asset is unique within the site. Factors considered include:
On the page for a discovered asset, you can view or add business context tags associated with that asset. For more information and instructions, see Applying RealContext with tags.
The asset Trend chart gives you the ability to view risk or vulnerabilities over time for this specific asset. Use the drop-down list to switch the view to risk or vulnerabilities.
You can view the Vulnerability Listing table for any reported vulnerabilities and any vulnerabilities excluded from reports. The table lists any exploits or malware kits associated with vulnerabilities to help you prioritize remediation based on these exposures.
Additionally, the table displays a special icon for any vulnerability that has been validated with an exploit. If a vulnerability has been validated with an exploit via a Metasploit module, the column displays the  icon. If a vulnerability has been validated with an exploit published in the Exploit Database, the column displays the
  icon. For more information, see Working with validated vulnerabilities
.
You can also view information about software, services, policy listings, databases, files, and directories on that asset as discovered by the application. You can view any users or groups associated with the asset.
The Addresses field in the Asset Properties pane displays all addresses (separated by commas) that have been discovered for the asset. This may include addresses that have not been scanned. For example: A given asset may have an IPv4 address and an IPv6 address. When configuring scan targets for your site, you may have only been aware of the IPv4 address, so you included only that address to be scanned in the site configuration. Viewing the discovered IPv6 address on the asset page allows you to include it for future scans, increasing your security coverage.
You can view any asset fingerprints. Fingerprinting is a set of methods by which the application identifies as many details about the asset as possible. By inspecting properties such as the specific bit settings in reserved areas of a buffer, the timing of a response, or a unique acknowledgement interchange, it can identify indicators about the asset’s hardware and operating system.
In the Asset Properties table, you can run a scan or create a report for the asset.
If you have scanned the asset with Policy Manager Checks, you can view the results of those checks in the Policy Listing table. If you click the name of any listed policy, you can view more information about it, such as other assets that were tested against that policy or the results of compliance checks for individual rules that make up the policy. For more information, see Working with Policy Manager results.
If you have scanned the asset with standard policy checks, such as for Oracle or Lotus Domino, you can review the results of those checks in the Standard Policy Listing table.
The Remediations panel shows lists of remediations that apply to the vulnerabilities on that asset. Selecting a link on one of the tabs leads to the specific instructions for remediating that item. The available tabs are:
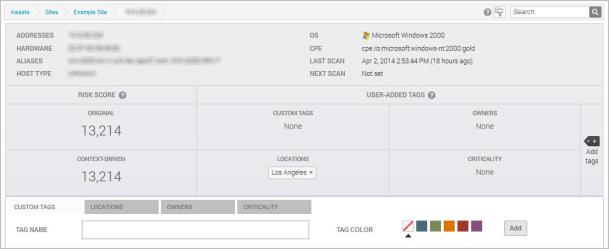
The page for a specific asset
You can also select a specific vulnerability from the Vulnerabilities table to view details about it as they relate to that specific asset. The Remediations section includes a table that displays tabs ordered from most to least precise in relevance to that asset. The available tabs are:
You may want to delete assets for one of several reasons:
If any of the preceding situations apply to your environment, a best practice is to create a dynamic asset group based on a scan date. See Working with asset groups. Then you can locate the assets in that group using the steps described in Locating and working with assets. Using the bulk asset deletion feature described in this topic, you can delete multiple inactive assets in one step.
If you delete an asset from a site, it will no longer be included in the site or any asset groups in which it was previously included. If you delete an asset from an asset group, it will also be deleted from the site that contained it, as well as any other asset groups in which it was previously included. The deleted asset will no longer appear in the Web interface or reports other than historical reports, such as trend reports. If the asset is rediscovered in a future scan it will be regarded in the Web interface and future reports as a new asset.
Note: Deleting an asset from an asset group is different from removing an asset from an asset group. The latter is performed in asset group management. See Working with asset groups.
You can only delete assets in sites or asset groups to which you have access.
To delete individual assets that you locate by using the site or asset group drill-down described in Locating and working with assets, take the following steps:
To delete individual assets that you are viewing by using the drill-down described in Viewing the details about an asset, take the following steps:
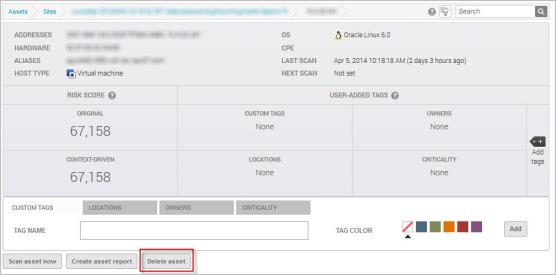
Deleting an individual asset from the asset details page.
To delete all the displayed assets that you locate by using the site or asset group drill-down, take the following steps:
To cancel your selection, click the top row in the Assets table. Then click Clear All in the pop-up that appears.
Note: This procedure deletes only the assets displayed in the table, not all the assets in the site or asset group. For example, if a site contains 100 assets, but your table is configured to display 25, you can only select those 25 at one time. You will need repeat this procedure or increase the number of assets that the table displays to select all assets. The Total Assets Selected field on the right side of the table indicates how many assets are contained in the site or asset group.
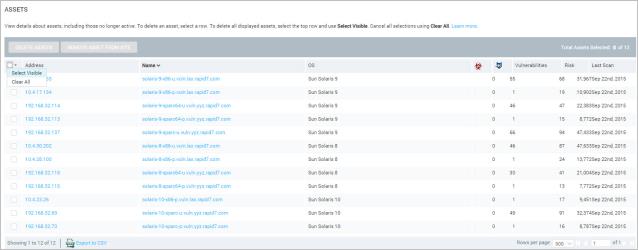
Deleting multiple assets in one step
To delete assets that you locate by using the Asset, Operating System, Software, or Service listing table as described in the preceding section, take the following step.
This action deletes an asset and all of its related data (including vulnerabilities) from any site or asset group to which it belongs, as well as from any reports in which it is included.
Note: Deletion is not currently available for Assets tables that you locate using theoperating system, software, service, or all-assets drill-downs. Single but not multiple deletion is available using the scannedanddiscovered by connection drill-downs.
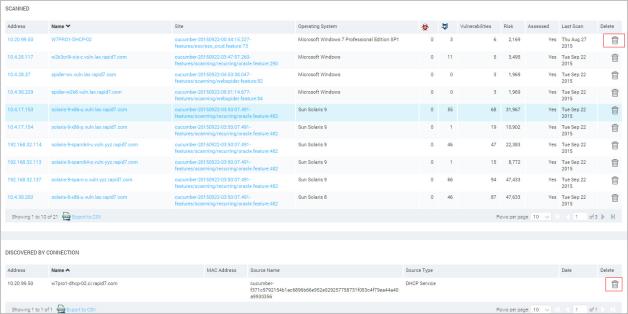
Deleting assets located via the scanned and discovered by connection drill-downs
If you are globally linking matching assets across all sites (see Linking assets across sites), you also have the option to remove an asset from a site, which breaks the link between the site and the asset. Unlike a deleted asset, the removed asset is still available in other sites in which is it was already present. However, if the asset is only in one site, it will be deleted from the entire workspace.
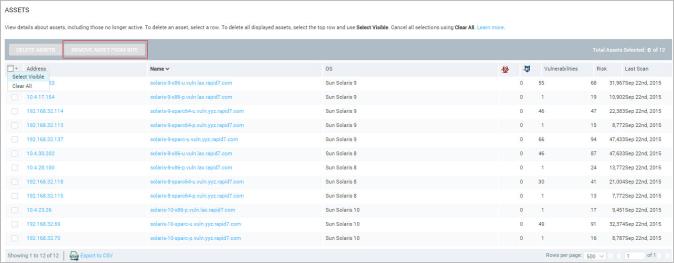
The option to remove assets from a site