This section addresses how to keep the application updated.
It is important to keep track of updates and to know which version of the application you are running. For example, a new vulnerability check may require the latest product update in order to work. If you are not seeing expected results for that check, you may want to verify that the application has installed the latest product update. Also, if you contact Technical Support with an issue, the support engineer may ask you which version and update of the application you are running.
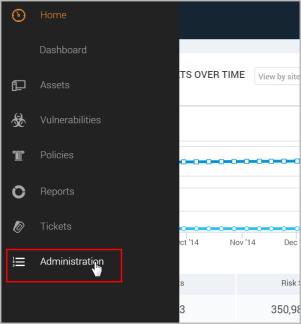
The Security Console displays the Administration page.
Administration tab
The Security Console displays the General page of the Security Console Configuration panel.
On this page you can view the current version of the application. You can also view the dates and update IDs for the current product and content updates. Release announcements always include update IDs, so you can match the IDs displayed on the Security Console page with those in the announcement to verify that you are running the latest updates.
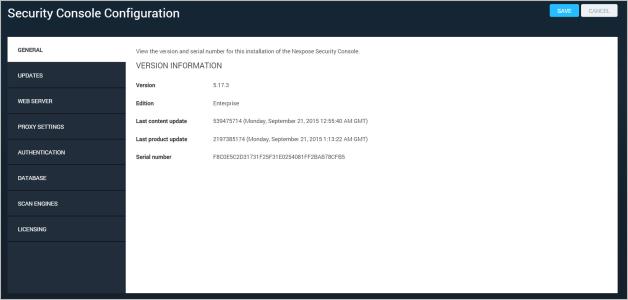
The General page of the Security Console Configuration panel
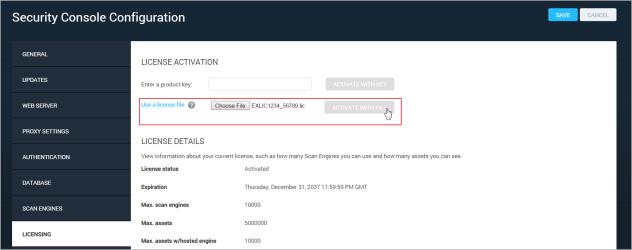
On the Licensing page, you can see license-related information about your Security Console. You also can activate a new license or start the process to modify or renew your license. Your Security Console must be connected to the Internet to activate your license.
Note: If your Security Console is not connected to the Internet, see Managing updates without an Internet connection.
The License Activation area displays general information about your license.
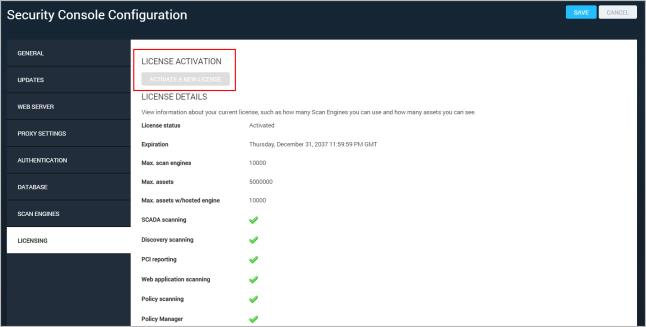
The Licensing page with the activation button
If your Security Console has Internet access, you can activate your license with a product key. Provided to you by the Account Management team, the key is a string of 16 numbers and letters separated into four groups by hyphens.
The Security Console displays a text box.
You can copy the key from the e-mail that was sent to you from the Account Management team.
The Security Console displays a success message.
You do not have to click Save. The application does not have to restart.
See Troubleshooting your activation if you receive errors during activation.
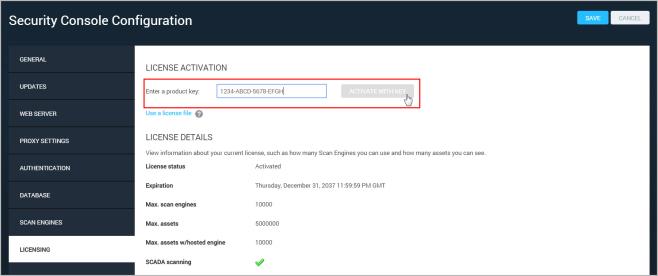
Entering a product key for activation
Watch a video about this feature.
If your Security Console does not have access to the Internet or to the updates.rapid7.com server, you can activate your license with a license file. Provided to you by the Account Management team, this file has a .lic extension and lists all the features and scanning capacities that are available with your license.
To activate with a license file:
The Security Console displays the Administration page.
The Security Console displays the Security Console Configuration panel.
The Security Console displays the Licensing page.
A button appears for choosing a file.
The file name appears on the Licensing page.
The Security Console displays a success message.
The Licensing page refreshes and displays the updated license information in the License Details area.
You do not have to click Save, and the Security Console does not have to restart.
Uploading a license file for activation
In the License Details area of the Licensing page, you can see more information about your license:
By default, the Security Console automatically downloads and applies two types of updates.
Content updates include new checks for vulnerabilities, patch verification, and security policy compliance. Content updates always occur automatically when they are available. However, it is possible to disable automatic content updates in the Security Console Configuration and schedule them at a time of your choosing.
Product updates include performance improvements, bug fixes, and new product features. It is possible to disable automatic product updates in the Security Console Configuration and update the product manually.
Note: When you apply a product update, the latest available content updates up to the current date will also be applied.

The Security Console Updates page
You can disable automatic product updates and initiate one-time product updates on an as-needed basis. This gives your organization the time and flexibility to train staff or otherwise prepare for updates that might cause changes in workflow. For example, a new feature may streamline a particular workflow by eliminating certain steps.
Note: Some new vulnerability and policy checks, which are included in content updates, require concurrent product updates in order to work properly.
To disable automatic product updates:
The Security Console Configuration panel appears.
A warning dialog box appears about the risks of disabling automatic product updates.
Click Disable automatic product updates to confirm that you want to turn off this feature.
Or click Cancel to leave automatic product updates enabled.
Whenever you change this setting and click Save, the application downloads any available product updates. If you have disabled the setting, it does not apply any downloaded product updates.
Note: Your PostgreSQL database must be version 9. Otherwise, the application will not apply product updates. If you are using an earlier version of PostgreSQL, see Migrating the database.
Enabling automatic product updates ensures that you are always running the most current version of the application.
To enable automatic product updates after they have been previously disabled:
The Security Console Configuration panel appears.
Whenever you change this setting and click Save, the application downloads any available product updates. If you have enabled the setting, it also applies any downloaded product updates and restarts.
When automatic product updates have been disabled, you can manually download product updates.
Note: By using this one-time update feature, you are not enabling future automatic product updates if they are not currently enabled.
To manually download a new product update:
Note: This option only appears if you have already disabled automatic product updates as described in Disabling automatic product updates.
The list of current and available updates appears.
The Releases page appears.
or (Optional) Click Cancel if you do not want to perform the update.
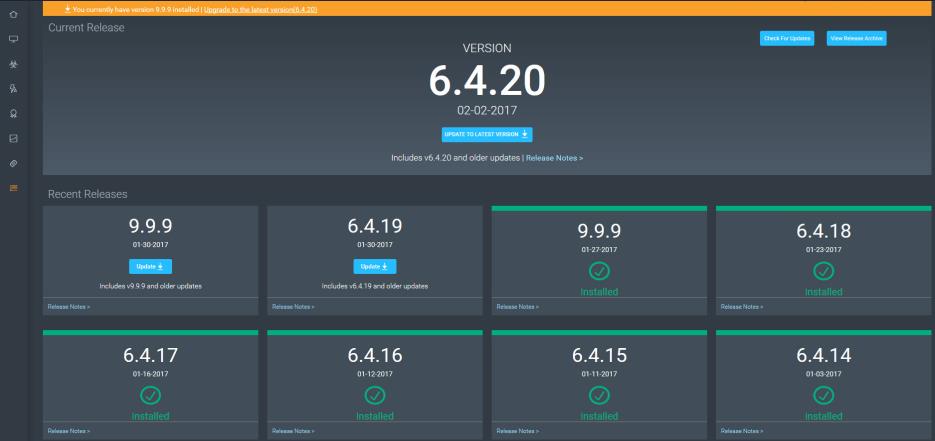
By default, the Security Console queries the update server for updates every six hours. If an update is available, the console downloads and applies the update and then restarts. You can schedule updates to recur at specific times that are convenient for your business operations. For example, you may want updates to only occur during non-business hours or at times when they won't coincide with and disrupt scans.
Note: Content updates are always applied according to the schedule, and product updates are applied according to the schedule only if they are enabled.
To schedule updates:
The Security Console Configuration screen appears.
The Updates page appears.
If the Security Console does not have direct Internet access, you can use a proxy server for downloading updates. In most cases, Technical Support will advise if you need to change this setting. This topic covers configuring proxy settings for updates. You can also learn how about
Note: For information on configuring updates for an Appliance, see the Appliance Guide which you can download from the Support page of Help.
To configure proxy settings for updates:
The Administration page appears.
The Security Console Configuration panel appears.
After you enter the information, click Save.
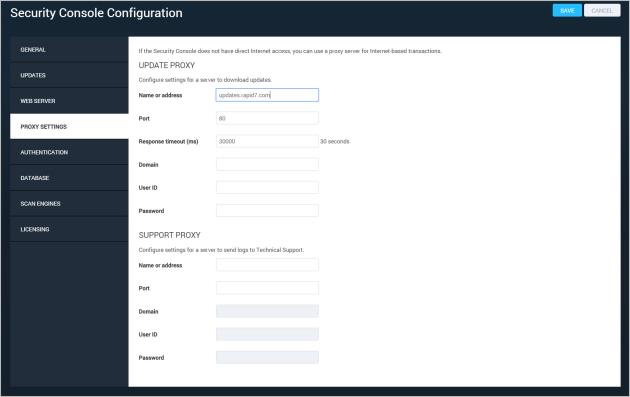
Security Console Configuration panel - Proxy Settings page
To determine a timeout interval for the proxy server, find out how much time the Security Console requires to download a certain number of megabytes. You can, for example, locate the downloaded .JAR archive for a recent update and learn from the log file how long it took for the Security Console to download a file of that size.
Open the nsc.log file, located in the [installation_directory]/nsc directory. Look for a sequence of lines that reference the download of an update, such as the following:
2013-06-05T00:04:10 [INFO] [Thread: Security Console] Downloading update ID 1602503.
2013-06-05T00:04:12 [INFO] [Thread: Security Console] Response via 1.1 proxy.example.com.
2013-06-05T00:05:05 [INFO] [Thread: Security Console] Response via 1.1 proxy.example.com.
2013-06-05T00:05:07 [INFO] [Thread: Security Console] Acknowledging receipt of update ID 1602503.
Note the time elapsed between the first entry (Downloading update ID...) and the last entry (Acknowledging receipt of update...).
Then go to the directory on the Security Console host where the .JAR archives for updates are stored: [installation_directory]/updates/packages. Locate the file with the update ID referenced in the log entries and note its size. Using the time required for the download and the size of the file, you can estimate the timeout interval required for downloading future updates. It is helpful to use a larger update file for the estimate.
Tip: In most cases, a timeout interval of 5 minutes (300,000 ms) is generally sufficient for most update file sizes.
Watch a video about this feature.
If your network environment is isolated from the Internet, you can apply an update by running the installer that is released with that update. When you start the installer, it automatically scans your current installation for files to repair or update and then applies those changes.
An "update" installation leaves your database and configuration settings intact. The only changes it makes to your deployment are the updates.
Note: You will require one computer to have Internet access, so that you can download the installer.
The first step is downloading the latest installer that is appropriate for your operating system.
Hyperlinks for downloading installers are available in the Nexpose Community at Security Street (community.rapid7.com). In Security Street, click Nexpose, and select Documents from the drop-down list. Then click Installation in the left navigation pane to view all related documentation. Select Nexpose installers, md5sum files, and Virtual Appliances for the latest files.
You can also use the following hyperlinks:
After you download the appropriate installer, take the following steps:
The installer displays a message that it will update the current installation, repairing any files as necessary.
Upon completing the installation, the installer displays a success message.
The Security Console displays a page that summarizes the update. Many releases include two updates: content and product. You can click the News link to see if another update has been applied for the release date.