Working with Policy Manager results
If you work for a U.S. government agency, a vendor that transacts business with the government, or a company with strict configuration security policies, you may be running scans to verify that your assets comply with United States Government Configuration Baseline (USGCB) policies, Center for Internet Security (CIS) benchmarks, or Federal Desktop Core Configuration (FDCC). Or you may be testing assets for compliance with customized policies based on these standards.
After running Policy Manager scans, you can view information that answers the following questions:
- What is the overall rate of compliance for assets in my environment?
- Which policies are my assets compliant with?
- Which policies are my assets not compliant with?
- If my assets have failed compliance with a given policy, which specific policy rules are they not compliant with?
- Can I change the results of a specific rule compliance test?
Viewing the results of configuration assessment scans enables you to quickly determine the policy compliance status of your environment. You can also view test results of individual policies and rules to determine where specific remediation efforts are required so that you can make assets compliant.
Distinguishing between Policy Manager and standard policies
Note: You can only view policy test results for assets to which you have access. This is true for Policy Manager and standard policies.
This section specifically addresses Policy Manager results. The Policy Manager is a license-enabled feature that includes the following policy checks:
-
USGCB 2.0 policies (only available with a license that enables USGCB scanning)
- USGCB 1.0 policies (only available with a license that enables USGCB scanning)
- Center for Internet Security (CIS) benchmarks (only available with a license that enables CIS scanning)
-
FDCC policies (only available with a license that enables FDCC scanning)
-
Custom policies that are based on USGCB or FDCC policies or CIS benchmarks (only available with a license that enables custom policy scanning)
You can view the results of Policy Manager checks on the Policies page or on a page for a specific asset that has been scanned with Policy Manager checks.
Standard policies are available with all licenses and include the following:
- Oracle policy
- Lotus Domino policy
- Windows Group policy
- AS/400 policy
- CIFS/SMB Account policy
You can view the results of standard policy checks on a page for a specific asset that has been scanned with one of these checks.
Standard policies are not covered in this section.
Getting an overview of Policy Manager results
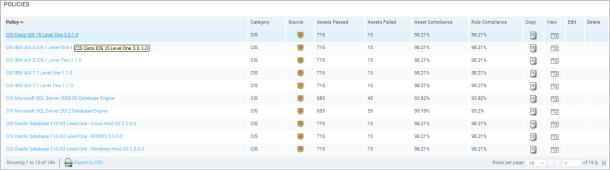
If you want to get a quick overview of all the policies for which you’ve run Policy Manager checks, go to the Policies page by clicking the Policies icon on any page of the Web interface. The page lists tested policies for all assets to which you have access.
The Policies table shows the number of assets that passed and failed compliance checks for each policy. It also includes the following columns:
-
Each policy is grouped in a category within the application, depending on its source, purpose, or other criteria. The category for any USGCB 2.0 or USGCB 1.0 policy is
- listed as USGCB. Another example of a category might be Custom, which would include custom policies based on built-in Policy Manager policies. Categories are listed under the Category heading.
- The Asset Compliance column shows the percentage of tested assets that comply with each policy.
-
The table also includes a Rule Compliance column. Each policy consists of specific rules, and checks are run for each rule. The Rule Compliance column shows the percentage of rules with which assets comply for each policy. Any percentage below 100 indicates failure to comply with the policy
-
The Policies table also includes columns for copying, editing, and deleting policies. For more information about these options, see
Creating a custom policy .
Viewing results for a Policy Manager policy
After assessing your overall compliance on the Policies page, you may want to view more specific information about a policy. For example, a particular policy shows less than 100 percent rule compliance (which indicates failure to comply with the policy) or less than 100 percent asset compliance . You may want to learn why assets failed to comply or which specific rule tests resulted in failure.
Tip: You can also view results of Policy Manager checks for a specific asset on the page for that asset. See
Viewing the details about an asset.
On the Policies page, you can view details about a policy in the Policies table by clicking the name of that policy.
Clicking a policy name to view information about it
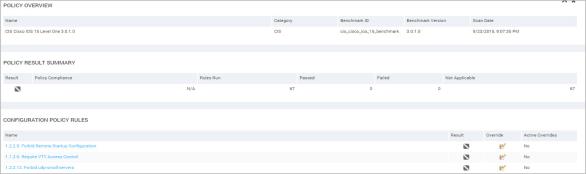
The Security Console displays a page about the policy.
At the top of the page, a pie chart shows the ratio of assets that passed the policy check to those that failed. Two line graphs show the five most and least compliant assets.
An Overview table lists general information about how the policy is identified. The benchmark ID refers to an exhaustive collection of rules, some of which are included in the policy. The table also lists general asset and rule compliance statistics for the policy.
The Tested Assets table lists each asset that was tested against the policy and the results of each test, and general information about each asset. The Asset Compliance column lists each asset’s percentage of compliance with all the rules that make up the policy. Assets with lower compliance percentages may require more remediation work than other assets.
You can click the link for any listed asset to view more details about it.
The Policy Rule Compliance table lists every rule that is included in the policy, the number of assets that passed compliance tests, and the number of assets that failed. The table also includes an Override column. For information about overrides, see
Overriding rule test results.
Understanding results for policies and rules
- A Pass result means that the asset complies with all the rules that make up the policy.
- A Fail result means that the asset does not comply with at least one of the rules that makes up the policy. The Policy Compliance column indicates the percentage of policy rules with which the asset does comply.
- A Not Applicable result means that the policy compliance test doesn’t apply to the asset. For example, a check for compliance with Windows Vista configuration policies would not apply to a Windows XP asset.
Viewing information about policy rules
Every policy is made up of individual configuration rules. When performing a Policy Manager check, the application tests an asset for compliance with each of the rules of the policy. By viewing results for each rule test, you can isolate the configuration issues that are preventing your assets from being policy-compliant.
Viewing a rule’s results for all tested assets
By viewing the test results for all assets against a rule, you can quickly determine which assets require remediation work in order to become compliant.
- Click the Policies icon.
The Security Console displays the Policies page.
- In the Policies table, click the name of a policy for which you want to view rule details.
The Security Console displays the page for the policy.
Tip: Mouse over a rule name to view a description of the rule.
- In the Policy Rule Compliance table, click the link for any rule that you want to view details for.
The Security Console displays the page for the rule.
The Overview table displays general information that identifies the rule, including its name and category, as well as the name and benchmark ID for the policy that the rule is a part of.
The Tested Assets table lists each asset that was tested for compliance with the rule and the result of the result of each test. The table also lists the date of the most recent scan for each rule test. This information can be useful if some remediation work has been done on the asset since the scan date, which might warrant overriding a Fail result or rescanning.
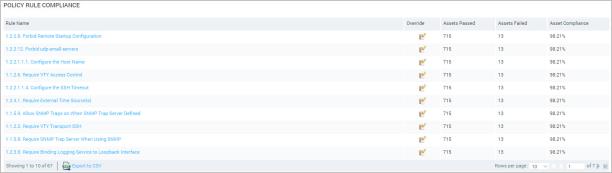
Policy Rule Compliance table on a policy page
Viewing CCE data for a rule
Every rule has a Common Configuration Enumerator (CCE) identifier. CCE is a standard for identifying and correlating configuration data, allowing this data to be shared by multiple information sources and tools.
You may find it useful to analyze a policy rule’s CCE data. The information may help you understand the rule better or to remediate the configuration issue that caused an asset to fail the test. Or, it may be simply useful to have the data available for reference.
- Click the Policiesicon.
The Security Console displays the Policies page.
- In the Policies table, click the name of a policy for which you want to view rule details.
The Security Console displays the page for the policy.
- In the Tested Assets table, click the IP address or name of an asset that has been tested against the policy.
The Security Console displays the page for the asset.
- In the Configuration Policy Rules table, click the name of the rule for which you want to view CCE data.
The Security Console displays the page for the rule.
Note: The application applies any current CCE updates with its automatic content updates.
- In the Configuration Policy Rule CCE Data table, view the rule’s CCE identifier, description, affected platform, and most recent date that the rule was modified in the National Vulnerability Database.
The Security Console displays the page for the rule.
- Click the link for the rule’s CCE identifier.
The Security Console displays the CCE data page.
The page provides the following information:
- The Overview table displays the rule Common Configuration Enumerator (CCE) identifier, the specific platform to which the rule applies, and the most recent date that the rule was updated in the National Vulnerability Database. The application applies any current CCE updates with its automatic content updates.
-
The Parameters table lists the parameters required to implement the rule on each tested asset.
-
The Technical Mechanisms table lists the methods used to test compliance with the rule.
-
The References table lists documentation sources to which the rule refers for detailed source information as well as values that indicate the specific information in the documentation source.
-
The Configuration Policy Rules table lists the policy and the policy rule name for every imported policy in the application.
Overriding rule test results
You may want to override, or change, a test result for a particular rule on a particular asset for any of several reasons:
- You disagree with the result.
- You have remediated the configuration issue that produced a Fail result.
- The rule does not apply to the tested asset.
When overriding a result, you will be required to enter your reason for doing so.
Another user can also override your override. Yet another user can perform another override, and so on. For this reason, you can track all the overrides for a rule test back to the original result in the Security Console Web interface.
The most recent override for any rule is also identified in the XCCDF Results XML Report format. Overrides are not identified as such in the XCCDF Human Readable CSV Report format. The CSV format displays each current test result as of the most recent override. See
Working with report formats.
All overrides and their reasons are incorporated, along with the policy check results, into the documentation that the U.S. government reviews in the certification process.
Understanding Policy Manager override permissions
Your ability to work with overrides depends on your permissions. If you do not know what your permissions are, consult your Global Administrator. These permissions apply specifically to Policy Manager policies.
Note: These permissions also include access to activities related to vulnerability exceptions. See
Managing users and authentication.
Three permissions are associated with policy override workflow:
- Submit Vulnerability Exceptions and Policy Overrides: A user with this permission can submit requests to override policy test results.
- Review Vulnerability Exceptions and Policy Overrides: A user with this permission can approve or reject requests to override policy rule results.
- Delete Vulnerability Exceptions and Policy Overrides: A user with this permission can delete policy test result overrides and override requests.
Understanding override scope options
When overriding a rule result, you will have a number of options for the scope of the override:
- This asset until the next scan: This scope is useful if a policy includes a rule that wasn’t relevant at a particular point in time but will be relevant in the future. For example, your organization disables remote desktop administration. However, unusual circumstances required the feature to be enabled temporarily on an asset so that a remote IT engineer could troubleshoot it. During that time window, a policy scan was run, and the asset failed the test for the remote desktop rule. You can override the Fail result for that specific scan, and it will not apply to future scans.
- This asset only: This scope is useful if a policy includes a rule that isn’t relevant for small number of assets. For example, your organization disables remote desktop administration except for three workstations. You can override a Fail result for the remote desktop rule for each of those three specific assets. This override will apply to all future scans, unless you override it again.
- All assets: You can override a rule for all assets in all sites. This scope is useful if assets are failing a policy that includes a rule that isn’t relevant to your organization. For example, an FDCC policy includes a rule for disabling remote desktop access. This rule does not make sense for your organization if your IT department administers all workstations via remote desktop access. This override will apply to all future scans, unless you override it again.
Viewing a rule’s override history
It may be helpful to review the overrides of previous users to give you additional context about the rule or a tested asset.
- Click the Policiesicon.
The Security Console displays the Policies page.
- In the Tested Assets table, click the name or IP address of an asset.
The Security Console displays the page for the asset.
- In the Configuration Policy Rules table, click the rule for which you want to view the override history.
The Security Console displays the page for the rule.
- See the rule’s Override History table, which lists each override for the rule, the date it occurred, and the result after the override. The Override Status column lists whether the override has been submitted, approved, rejected, or expired.
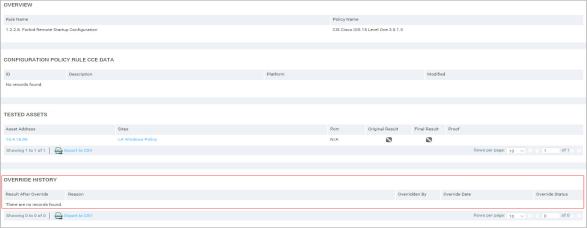
A rule’s override history
Submitting an override of a rule for all assets in all sites
- Click the Policies icon.
The Security Console displays the Policies page.
- In the Policies table, click the name of the policy that includes the rule for which you want to override the result.
The Security Console displays the page for the policy.
- In the Policy Rule Compliance table, click the Override icon for the rule that you want to override.
The Security Console displays a Create Policy Override pop-up window.
- Select an override type from the drop-down list:
- Pass indicates that you consider an asset to be compliant with the rule.
- Fail indicates that you consider an asset to be non-compliant with the rule.
- Fixed indicates that the issue that caused a Fail result has been remediated. A Fixed override will cause the result to appear as a Pass in reports and result listings.
- Not Applicable indicate that the rule does not apply to the asset.
- Enter your reason for requesting the override. A reason is required.
- If you only have override request permission, click Submit to place the override under review and have another individual in your organization review it. The override request appears in the Override History table of the rule page.
OR
If you have override approval permission, click Submit and approve.
Submitting an override of a rule for all assets in a site
- Click the Policies icon.
The Security Console displays the Policies page.
- In the Policiestable, click the name of the policy that includes the rule for which you want to override the result.
The Security Console displays the page for the policy.
- In the Tested Assets table, click the name or IP address of an asset.
The Security Console displays the page for the asset. Note that the navigation bread crumb for the page includes the site that contains the asset.
The page for an asset selected from a policy page
- In the Configuration Policy Rules table, click the Override icon for the rule that you want to override.
The Security Console displays a Create Policy Override pop-up window.
- Select All assets from the Scope drop-down list.
- Select an override type from the drop-down list:
- Pass indicates that you consider an asset to be compliant with the rule.
- Fail indicates that you consider an asset to be non-compliant with the rule.
- Fixed indicates that the issue that caused a Fail result has been remediated. A Fixed override will cause the result to appear as a Pass in reports and result listings.
- Not Applicable indicates that the rule does not apply to the asset.
- Enter your reason for requesting the override. A reason is required.

Submitting a site-specific override
- If you only have override request permission, click Submit to place the override under review and have another individual in your organization review it. The override request appears in the Override History table of the rule page.
OR
If you have override approval permission, click Submit and approve.
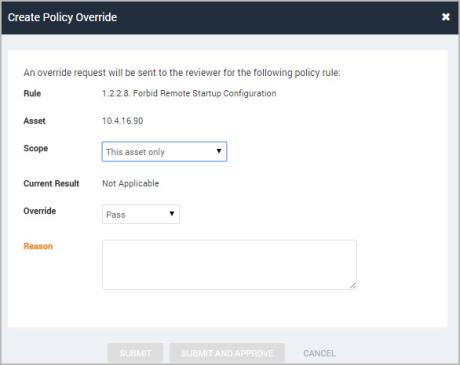
Submitting an override of a rule for all scans on a specific asset
- Click the Policies icon.
The Security Console displays the Policies page.
- In the Policies table, click the name of the policy that includes the rule for which you want to override the result.
The Security Console displays the page for the policy.
- In the Tested Assets table, click the name or IP address of an asset.
- The Security Console displays the page for the asset. Note that the navigation bread crumb for the page includes the site that contains the asset. In the Configuration Policy Rules table, click the Override icon for the rule that you want to override.
The Security Console displays a Create Policy Override pop-up window.
- Select This asset only from the Scope drop-down list.
- Select an override type from the drop-down list:
- Pass indicates that you consider an asset to be compliant with the rule.
- Fail indicates that you consider an asset to be non-compliant with the rule.
- Fixed indicates that the issue that caused a Fail result has been remediated. A Fixed override will cause the result to appear as a Pass in reports and result listings.
- Not Applicable indicates that the rule does not apply to the asset.
- Enter your reason for requesting the override. A reason is required.
Submitting an asset-specific override
- If you only have override request permission, click Submit to place the override under review and have another individual in your organization review it. The override request appears in the Override History table of the rule page.
OR
If you have override approval permission, click Submit and approve.
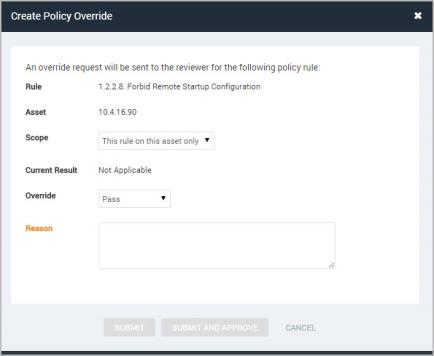
Submitting an override of a rule for a specific scan on a single asset
- Click the Policies icon.
The Security Console displays the Policies page.
- In the Policiestable, click the name of the policy that includes the rule for which you want to override the result.
The Security Console displays the page for the policy.
- In the Tested Assets table, click the name or IP address of an asset.
- The Security Console displays the page for the asset. Note that the navigation bread crumb for the page includes the site that contains the asset. In the Configuration Policy Rules table, click the Override icon for the rule that you want to override.
The Security Console displays a Create Policy Override pop-up window.
- Select This rule on this asset only from the Scope drop-down list.
- Select an override type from the drop-down list:
- Pass indicates that you consider an asset to be compliant with the rule.
- Fail indicates that you consider an asset to be non-compliant with the rule.
- Fixed indicates that the issue that caused a Fail result has been remediated. A Fixed override will cause the result to appear as a Pass in reports and result listings.
- Not Applicable indicate that the rule does not apply to the asset.
- Enter your reason for requesting the override. A reason is required.
Submitting an asset-specific override
- If you only have override request permission, click Submit to place the override under review and have another individual in your organization review it. The override request appears in the Override History table of the rule page.
OR
If you have override approval permission, click Submit and approve.
Reviewing an override request
Upon reviewing an override request, you can either approve or reject it.
- Click the Administration icon of the Security Console Web interface.
- On the Administration page, click the Review link below Exceptions and Overrides.
- Locate the request in the Configuration Policy Override Listing table.
To select multiple requests for review, select each desired row.
OR, to select all requests for review, select the top row.
- Click the Under review link in the Review Status column.
- In the Review Status dialog box, read the comments by the user who submitted the request and decide whether to approve or reject the request.
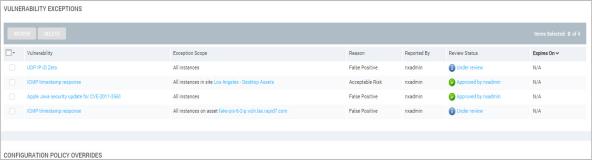
Selecting an override request to review
- Enter comments in the Reviewer’s Comments text box. Doing so may be helpful for the submitter.
- If you want to select an expiration date for override, click the calendar icon and select a date.
- Click Approve or Reject, depending on your decision.
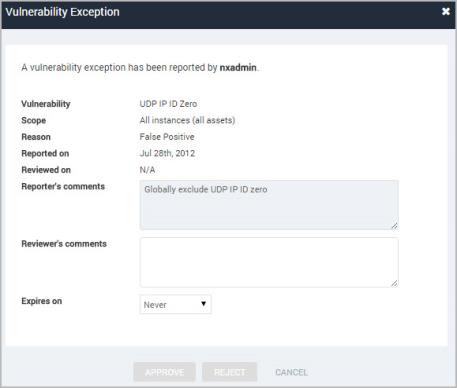
Approving an override request
The result of the review appears in the Review Status column. Also, if the rule has never been previously overridden and the override request has been approved, its entry will switch to Yes in the Active Overrides column in the Configuration Policy Rules table of the page. The override will also be noted in the Override History table of the rule page.
Deleting an override or override request
You can delete old override exception requests.
- Click the Administration icon of the Security Console Web interface.
- On the Administration page, click the Manage link next to Exceptions and Overrides.
Tip: You also can click the top row check box to select all requests and then delete them all in one step.
- In the Configuration Policy Override Listing table, select the check box next to the rule override that you want to delete.
To select multiple requests for deletion, select each desired row.
OR, to select all requests for deletion, select the top row.
- Click the Delete icon. The entry no longer appears in the Configuration Policy Override Listing table.