Forensics Jobs
InsightIDR provides you the ability to search for and document specific malicious behavior using forensic jobs. Forensic jobs are accessed through the Scheduled Hunt functionality that you can access from the Investigations page.
The following forensic jobs are available:
- ARP cache
- Current process
- Installed service
- Directory entry
- DNS cache
- Network connection
- Registry key
- Scheduled task
- User session
ARP Cache
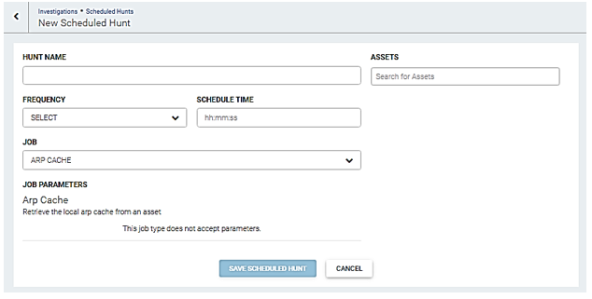
The ARP Cache job retrieves the local ARP cache from an asset and checks for ARP cache poisoning. Perform the following steps to run this job.
- Enter the name for this hunt in the Hunt Name field.
- Select the run frequency for this hunt from the Frequency dropdown menu. You can schedule a hunt to run daily, weekly, or monthly.
- Enter the time to run this job in the Schedule Time field. Enter the time in hours, minutes, and seconds.
- Enter the asset(s) to run this hunt against in the Asserts field.
- Select Arp Cache from the Job dropdown menu.
- This job does not accept parameters. Click the Save Scheduled Hunt button.
Current Process
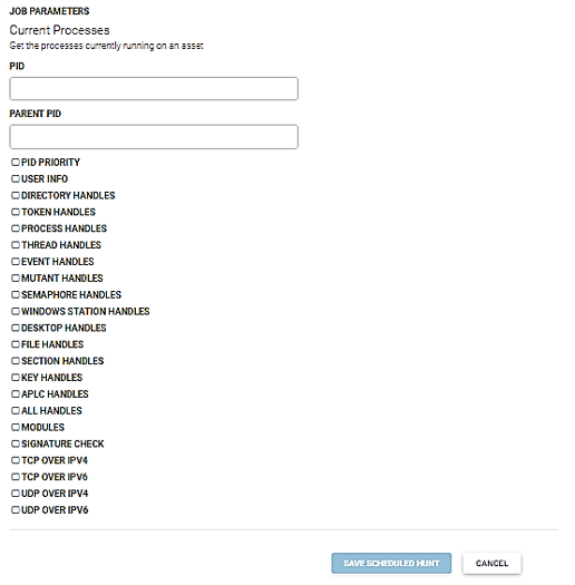
This job retrieves the processes currently running on the selected asset. It retrieves: PID priority, user info, directory handles, token handles, process handles, thread handles, event handles. mutant handles, semaphore handles, window station handles, desktop handles, file handles. section handles, key handles, ALPC handles, all handles, modules, signature check, TCP over IPV4, TCP over IPV6, UDP over IPV4, and UDP over IPV6.
User info
This parameter displays who the owner of the process is and additional account info.
Handles
A handle is a descriptor that a process opens to modify or access a resource; it is a reference to that resource. For example, if the process opens a registry key, it has a key handle to it. In addition, it could also correspond to several other opened kernel objects by processes like mutants, semaphores and threads.
Modules
A module in this case, is a dynamic library the process has loaded or the name of the executable.
Mutant
A mutant is another name for a Mutex, formally known as a mutual exclusion. It ensures that two threads cannot access a shared resource at the same time. Typically, malware creates named mutexes that we can look for to show commonality between malware families.
Semaphore
A semaphore ensures that only so many threads can access a given resource at once. Using a restaurant analogy, only 50 people are allowed in, after that no one may enter until someone leaves. Only a maximum of 50 people are allowed in at any time.
Section
A section is a chunk of memory that can be shared with other processes or mapped to a file.
Advanced Local Procedure Call (ALPC)
Processes can have Advanced Local Procedure Call (ALPC) ports to communicate to various subsystems or processes. You can think of this as a local Remote Procedure Call (RPC) mechanism.
Perform the following steps to run the current process job.
- Enter the name for this hunt in the Hunt Name field.
- Enter the asset(s) to run this hunt against in the Asserts field.
- Select the run frequeny for this hunt from the Frequency dropdown menu. You can schedule a hunt to run daily, weekly, or monthly.
- Enter the time to run this job in the Schedule Time field. Enter the time in hours, minutes, and seconds.
- Select Current Process from the Job dropdown menu.
![]()
- Enter the process id (PID) in the PID field.
- Enter the parent PID in the Parent PID field.
- Check the appropriate parameters.
- Click the Save Scheduled Hunt button.
Installed Service
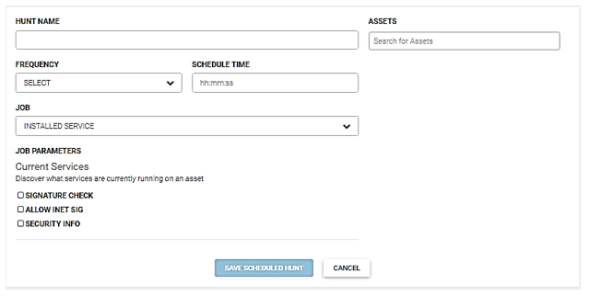
This job retrieves information about installed services. The job parameters are: signature check, allow INET SIG, and security info.
Signature check
If a binary/DLL is signed, InsightIDR sees if it is a valid signature. For Windows, if provided DLLs and exes are signed by Microsoft, the output reflects this.
Allow INET SIG
Enables or disables the use of using the network to verify signatures. If disabled, InsightIDR only uses the local cache for revocation checking.
Security Info
This is a technical flag geared for the AR/IR folks. It enables InsightIDR to see all access and owner info for a given service.
Perform the following steps to run this job.
- Enter the name for this hunt in the Hunt Name field.
- Enter the asset(s) to run this hunt against in the Asserts field.
- Select the run frequency for this hunt from the Frequency dropdown menu. You can schedule a hunt to run daily, weekly, or monthly.
- Enter the time to run this job in the Schedule Time field. Enter the time in hours, minutes, and seconds.
- Select Installed Service from the Job dropdown menu.
- Check the appropriate job parameters.
- Click the Save Scheduled Hunt button.
Directory entry
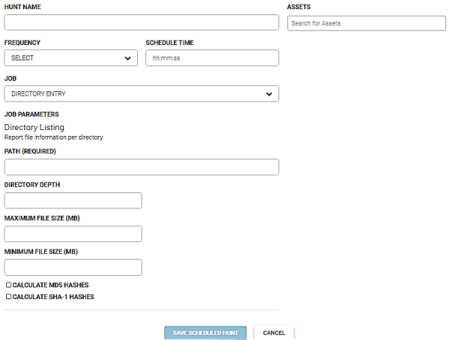
This job retrieves information about specified directories. There are four parameters: path, directory depth, maximum filed size, and minimum field size.
Perform the following steps to run this job.
- Enter the name for this hunt in the Hunt Name field.
- Enter the asset(s) to run this hunt against in the Asserts field.
- Select the run frequency for this hunt from the Frequency dropdown menu. You can schedule a hunt to run daily, weekly, or monthly.
- Enter the time to run this job in the Schedule Time field. Enter the time in hours, minutes, and seconds.
- Select Directory Entry from the Job dropdown menu.
- Enter the directory path in the Path field. Enter -1 to search all directories.
- Enter the directory depth in the Directory Depth field. Enter -1 to search all directories.
- Enter the maximum file size (in megabytes) in the Maximum File Size (MB) field.
- Enter the minimum file size (in megabytes) in the Minimum File Size (MB) field.
- Check the Calculate MD5 Hashes checkbox if you need to calculate MD5 hashes.
- Check the Calculate SHA-1 Hashes checkbox if you need to calculate SHA-1 hashes.
- Click the Save Scheduled Hunt button.
DNS cache
This job returns local DNS cache and LOCAL A/CNAME record resolution if a resolver service is running.
This job never makes any outbound requests to resolve entries and is hardcoded.
Perform the following steps to run this job.
- Enter the name for this hunt in the Hunt Name field.
- Enter the asset(s) to run this hunt against in the Asserts field.
- Select the run frequency for this hunt from the Frequency dropdown menu. You can schedule a hunt to run daily, weekly, or monthly.
- Enter the time to run this job in the Schedule Time field. Enter the time in hours, minutes, and seconds.
- Select Dns Cache from the Job dropdown menu.
- This job does not accept parameters. Click the Save Scheduled Hunt button.

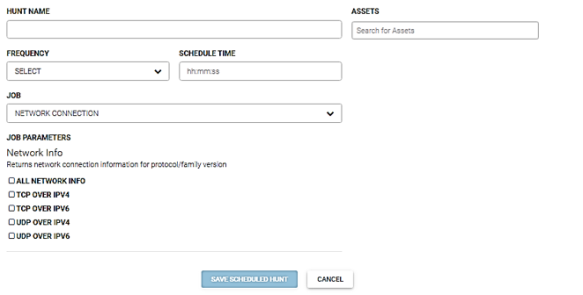
Network connection
This job returns network connection information about the protocol and family version. The job parameters are: all network info, TCP over IPV4, TCP over IPV6, UDP over IPV4, and UDP over IPV6.
- Enter the name for this hunt in the Hunt Name field.
- Enter the asset(s) to run this hunt against in the Asserts field.
- Select the run frequency for this hunt from the Frequency dropdown menu. You can schedule a hunt to run daily, weekly, or monthly.
- Enter the time to run this job in the Schedule Time field. Enter the time in hours, minutes, and seconds.
- Select Network Connection from the Job dropdown menu.
- Check the appropriate job parameters.
- Click the Save Scheduled Hunt button.
Registry key
This job parses specified registry hives for keys. When the agent is installed as a system service, HKCU reflects this. If a user wants to look at a user specific key within the user’s hive, they need to root their queries from HKU/<user-sid> and not HKCU. The reason for this is HKCU is simply a pointer (aka symlink) to who is accessing the registry and in our case, the agent, as system. This means HKCU is actually pointing to HKU/<system-sid> and not the logged on user. This job also supports regex within key paths so users don’t need to know the exact key path names.
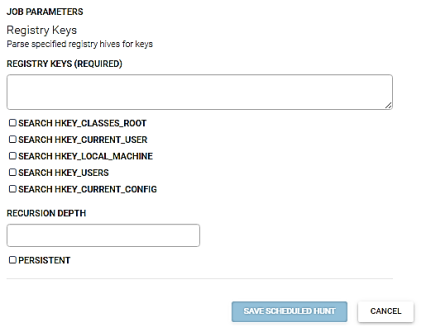
The parameters for this job are: registry keys, search HKEY_CLASSES_ROOT, search HKEY_CURRENT_USER, search HKEY_LOCAL_MACHINE, search HKEY_LOCAL_MACHINE, search HKEY_USERS, search HKEY_CURRENT_CONFIG, recursive depth, and persistent.
Perform the following steps to run this job.
- Enter the name for this hunt in the Hunt Name field.
- Enter the asset(s) to run this hunt against in the Asserts field.
- Select the run frequency for this hunt from the Frequency dropdown menu. You can schedule a hunt to run daily, weekly, or monthly.
- Enter the time to run this job in the Schedule Time field. Enter the time in hours, minutes, and seconds.
- Select Registry Key from the Job dropdown menu.
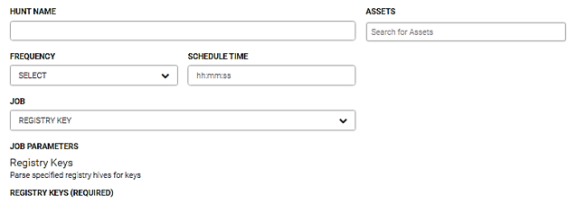
- Enter the registry key(s) in the Registry Keys field.
- Check the appropriate Search HKEY parameter check boxes.
- Enter the recursion depth in the Recursion Depth field. Enter -1 to search all.
- If needed, check the Persistent check box.
- Click the Save Scheduled Hunt button.
Scheduled task
This job retrieves all scheduled tasks on an asset. Perform the following steps to run this job.
- Enter the name for this hunt in the Hunt Name field.
- Enter the asset(s) to run this hunt against in the Asserts field.
- Select the run frequency for this hunt from the Frequency dropdown menu. You can schedule a hunt to run daily, weekly, or monthly.
- Enter the time to run this job in the Schedule Time field. Enter the time in hours, minutes, and seconds.
- Select Scheduled Task from the Job dropdown menu.
- This job does not accept parameters. Click the Save Scheduled Hunt button.

User session
This job enumerates all of the system sessions on an asset. The job parameters are: active connections and remote connections.
For Windows Vista - Windows Server 2008 (and greater), users see only services in session 0, then users will show up in subsequent sessions. This is normal behavior and something Microsoft implemented as a security fix called “session 0 isolation”.
This job retrieves all scheduled tasks on an asset. Perform the following steps to run this job.
- Enter the name for this hunt in the Hunt Name field.
- Enter the asset(s) to run this hunt against in the Asserts field.
- Select the run frequency for this hunt from the Frequency dropdown menu. You can schedule a hunt to run daily, weekly, or monthly.
- Enter the time to run this job in the User Session field. Enter the time in hours, minutes, and seconds.
- Select Scheduled Task from the Job dropdown menu.
- If needed, check the Active Connections and/or Remote Connections check boxes.
- Click the Save Scheduled Hunt button.

What's Next?